Exhibition onions are often referred to as giant onions for their impressive fruit size. The culture is quite whimsical, but when all the proper conditions are provided, it pleases with a rich harvest. There are many ways to plant Exhibition onions.

Onions Exclusive
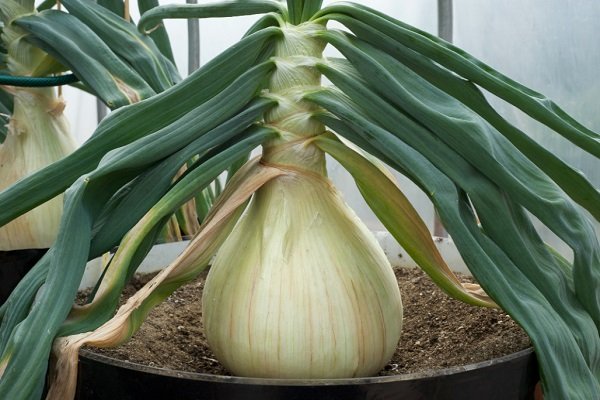
One exhibition bulb can weigh 1 kg
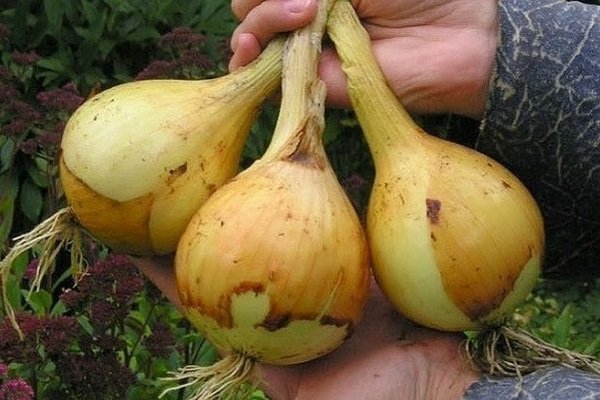
Onion Exhibition has a sweet taste without bitterness
Characteristics of the variety, its advantages and disadvantages
The exhibition was brought out in Holland. The characteristics of the variety are as follows:
- large bulbs – one copy can weigh 0,5 kg, sometimes the weight reaches 1 kg;
- oval shape of the bulbs;
- the husk is thin, yellowish;
- tender and juicy, but dense pulp;
- sweet taste, no bitterness.
This variety is considered salad. Due to its taste, the main way to use it is in its raw form. Onions are also used for cooking first and second courses.
The advantages of the Exhibition variety are as follows:
- growing in different ways: seeds, seedlings, onion sets;
- the possibility of winter sowing;
- versatility – grown both for greens and for fruits;
- good yields – from 1 sq. m you can collect up to 3 kg of onions;
- ease of harvesting;
- excellent taste characteristics;
- processing without tears, which is caused by a lower content of essential oils;
- there is no characteristic odor after eating raw.
The disadvantages of the variety are minimal. These include the capriciousness of the culture to growing conditions and short storage.
Ways of planting
Exhibition can be planted in many ways. This advantage allows you to choose the best option for a particular region and according to your own preferences. Each case has its own characteristics.
Seeds
When choosing this method of planting, the bulbs do not reach their maximum size. They usually weigh an average of 250-300 g.
Exhibition seeds are planted in April. Specific dates depend on the climatic features of the region. In Siberia and the middle lane, it is better to wait until mid-May, since the possibility of frost is high.
There is another option for planting Exhibishen onions with seeds – winter sowing. This option attracts with fast shoots in the spring and an early harvest. During winter sowing, the seeds harden well, so the immunity of the culture increases markedly. Landing is carried out immediately before frosts or at their very beginning.
When choosing a method for planting this variety with seeds, you need to act according to the following algorithm:
- Test for germination. This stage is recommended to be carried out in advance, preferably a month before sowing. It is necessary to select a few seeds, wrap with a cloth and soak in warm water. Then leave them in the fabric for 5 days and constantly moisturize. It remains to evaluate the germination.
- Disinfection. For this, a solution of potassium permanganate is used. Seeds should be kept in it for a quarter of an hour.
- Preparing for planting. Although this step is optional, it greatly facilitates further work. If you perform such preparation, then thinning the beds in the future will not be needed.
You need to prepare strips of toilet paper by cutting it lengthwise into 3 parts. The seeds are attached to these strips with a liquid paste based on potato starch – 2 tsp. Pour the product with a glass of water and cook over low heat until thickened, not forgetting to stir.
It is effective to use AVA complex fertilizer, it should be added to the cooled mass. It is convenient to apply the glue pointwise with a syringe, making intervals of 5 cm. Introduce seeds into each glue point using tweezers. Wait for the paste to dry, roll each strip and put it in a plastic bag. - Application of wood ash. You need 50 g of fertilizer per square meter.
- Loosening and leveling the soil. The procedure allows you to saturate the soil with oxygen.
- Fungicide treatment to prevent fungal diseases. Usually they resort to Fitosporin. It is necessary to dissolve 1 tbsp. l. drug in a 10-liter bucket of water.
- Groove preparation. It should be deepened by a maximum of 2 cm.
- Landing. Carefully place a paper strip in each prepared groove. The seeds should be on top. Fill the grooves carefully with soil.
- Watering. Carry it out immediately after sprinkling the grooves, do not spare water.
- Shelter. Film or other suitable material may be used. This allows you to protect the crop in case of frost.
Basic soil preparation should be carried out in the fall. It is necessary to dig the selected area, get rid of weeds, roots, insect larvae. If the soil is light, then in the spring it will be enough to loosen it.
Exhibition can be grown both in open ground and in a greenhouse or greenhouse. The second method is attractive by maintaining heat and a sufficient level of humidity, which ensures a good harvest.
During the winter sowing of onion Exhibition, the algorithm of work is as follows:
- Choose a suitable site. The place should be sunny and elevated.
- Prepare the beds. They must be tall. Be sure to add humus and sand, get rid of weeds.
- Make grooves or holes. Deepen by 2 cm. Leave 20 cm between rows.
- Sow the seeds. Sowing should be dense, since not all seeds will sprout.
- Sprinkle plantings with earth and water. Use a watering can with small holes, the water should be warm.
- Mulch. Use peat, straw and sawdust. Layer thickness – 2 cm. Mulch provides plantings with moisture retention, protection from weeds and frost.
- Re-mulch. This stage is recommended for cold regions, which are characterized by spring frosts. Re-mulch the beds when the snow melts.
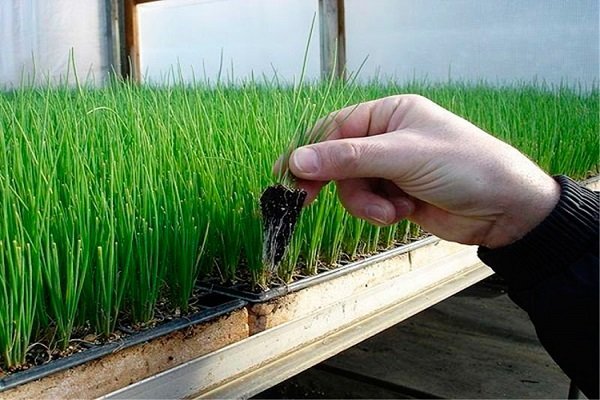
Seedlings
For the Exhibition variety, this planting method is considered the best, but also the most difficult. Seedlings allow you to get a crop earlier, the bulbs reach their maximum size and weight.
Planting seeds for seedlings should be in March. You need to act according to the following algorithm:
- Soaking and drying seeds. Seeds should be wrapped in a thin strip of cloth and soaked in warm water. Then dry the material in a shaded place for 3-4 days.
- Disinfection of planting material. To do this, it is better to use a weak solution of potassium permanganate – it is enough to dissolve 1 g of the drug in 1 liter of water. The optimum water temperature for disinfection is 40 degrees.
- Soil preparation. You can buy ready-made soil suitable for this crop, or you can make the mixture yourself using soddy soil, humus and rotted mullein in a ratio of 9:9:1.
- Seed sowing. You can use special boxes or plastic containers for this. There is no need to make recesses, the seeds are sown on the surface, and only then sprinkled with earth. A layer of 1 cm is enough.
- Watering. Use a spray bottle, water generously.
- Waiting for seedlings. A container with plantings should be placed in a shaded place and kept there for 1-1,5 weeks, covering the crops with a film.
After the emergence of seedlings, the film shelter must be removed, and the seedlings should be placed in a place illuminated by the sun. The ideal option is the south side.
For successful cultivation of seedlings, certain conditions must be met:
- temperature regime – 20-22 degrees, after the appearance of young leaves, it is recommended to reduce the daytime temperature to 17-20 degrees, the night temperature to 10-15 degrees;
- regular airing of the room with seedlings, it is optimal to do this every 3 days;
- daily watering, it is recommended to add mineral fertilizers to the water.
The process of growing seedlings takes 2 months. 2 weeks before its landing in open ground, it is necessary to begin hardening. To do this, the seedlings are taken out into the fresh air, at home they are limited to a balcony or an open window. Increase the duration of hardening gradually, starting from a quarter of an hour.
Seedlings should be planted in early May. The site should be well lit, the soil should meet the requirements of this variety. Manure is allowed to be applied only in the fall, its use in the spring provokes friability of the bulbs.
Planting seedlings is carried out according to the following algorithm:
- Loosen the soil and level the surface.
- If necessary, get rid of weeds.
- Water the soil and seedlings.
- Make holes.
- Trim the roots of seedlings to a third of the length.
- Deepen the seedlings into the soil by 2,5-3 cm. Keep a distance of 20 cm between them, and 10 cm more between rows.
- Gently sprinkle the planted seedlings with earth.
- After 20 days, make the first top dressing.
Only healthy and strong seedlings should be planted. Sick and weak specimens should be discarded immediately.
Onion sets
This method of planting the Exhibition onion is less common. Seeds of this variety are not found on sale, although you can find it from some private traders, so they usually grow it from seeds on their own.
Planting sevka can be carried out in spring or winter. In any case, it is necessary to carry out disinfection and antifungal prophylaxis of planting material. You can disinfect it with a solution of potassium permanganate, and fungicides will help prevent the appearance of fungus.
Planting sevka is attractive for its simplicity and getting a good harvest. To get a set, the seeds must be planted densely. Landing rules are general.
Soil requirements
For the Exhibition variety, sandy and sandy loamy soil is more suitable. A prerequisite is its friability, lightness and nutritional value.
It is effective to introduce humus into the soil – 2 buckets of fertilizer for each square meter. Additionally, mineral fertilizers and finely crushed charcoal should be used. If possible, add river sand.
Outdoor plant care
When grown in open ground, the culture requires comprehensive care. It consists in watering, weeding and loosening, mulching, top dressing, prevention of possible diseases and their timely treatment.
Watering
The frequency of watering should be focused on the condition of the soil. It is necessary to wait for it to dry, but the earth should not dry out completely. Watering should be moderate, warm water should be used.
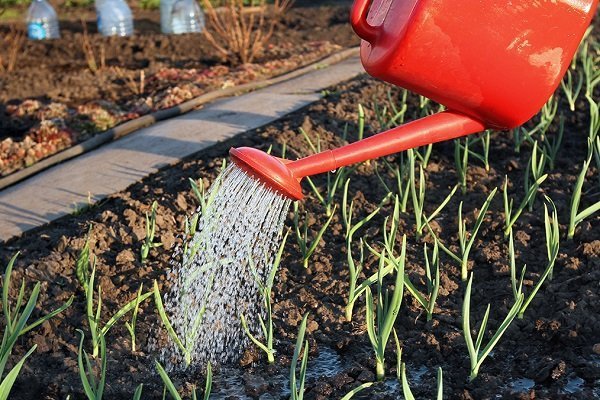
Be sure to take into account the weather conditions. In hot and dry periods, you should switch to daily watering. It should be done in the evening.
Watering should be stopped a month before harvest. It usually finishes at the end of July. If watering is not stopped, then the bulbs will be watery, which will significantly reduce the period of their possible storage.
Additional fertilizing
The first top dressing is carried out 2 weeks after planting the crop. You can use mullein infusion or complex fertilizer with potassium, nitrogen and phosphorus.
Fertilizers are applied three times per season. Leave at least 3 weeks between feedings.
Fertilization should be stopped a month before harvest.
Weeding and loosening
Loosening is an obligatory stage of crop care. Produce it after each watering. This is necessary to aerate the soil. With daily watering in a drought, it is not necessary to loosen the soil every day. It is enough to do this 1-2 times a week. When loosening, you must act carefully so as not to damage the root system.
Another prerequisite for proper crop care is timely weeding. Ignoring such work leads to the growth of weeds, which adversely affects the development of culture.
Mulching
Mulch is necessary to retain moisture in the soil, which is regularly loosened. For mulching can be used:
- straw;
- sawdust;
- paper;
- wood rot.
Pest and disease control
This stage begins even at the time of seed treatment or sowing before planting. Decontamination and antimicrobials can reduce the risk of many diseases.
When growing the Exhibition variety, you may encounter the following problems:
- Head. The disease is manifested by dark ash translucent stripes on the feathers. If you get rid of them in time, then the culture can be saved. Otherwise, this area will be unsuitable for planting for several years, since spores persist for a long time.
- Rot. The disease is fungal. The defeat of the bulbs occurs from the inside. This is evidenced by their softness and sliminess. To prevent the disease, you need to adhere to moderation in watering and carry out fungicidal treatment. If the disease has already manifested itself, then it is impossible to cure the plants – you need to remove all the affected specimens and burn them.
- Lukovaâ flies. It is not adults that infect the culture, but larvae emerging from eggs laid in the soil and onion scales. The appearance of a pest is judged by the yellowing and drying of seedlings, softening and decay of the bulbs. Usually the onion fly appears in May-June. The treatment is tobacco dust, to which ash and black pepper should be added. You can powder the culture with a dry agent or prepare an infusion for spraying. They also use insecticides.
- The stem nematode. Bulbs serve as food for this small worm. When it appears, the feathers become discolored and curled. It is necessary to immediately remove diseased specimens, followed by incineration. Prevention is tillage with lime flour and careful selection of planting material.
Landings should be regularly inspected. Such control allows you to detect a disease or pest in a timely manner and take appropriate measures. Otherwise, there is a risk of losing the entire crop.
Harvesting and storage of crops
Signs that it’s time to harvest Exhibition onions are similar to other varieties of this crop. This is a lighter and dried greens. Usually the crop is harvested in the second half of August, but the timing may vary depending on the time and method of planting the crop, as well as the climatic features of a particular region.
Harvesting the onion Exhibition attracts with its simplicity. The bulbs lie on the surface, so their extraction is not difficult. It is convenient to use a pitchfork, but you need to act carefully so as not to damage the fruit.
Harvesting should be carried out in dry weather, it is better to choose a sunny day. Work should not be carried out immediately after the rains, the onion should dry out.
You don’t need to cut the pen. After harvesting, it is necessary to dry it. If possible, this should be done in the attic, since such rooms are darkened and well ventilated. First you need to dry the crop in the sun.
After the thinning and drying of the necks, it is necessary to remove the excess husk and place the onion in storage. It is good to use nets or wooden boxes for this. The room should be dry and cool, the optimum temperature is 5 degrees.
Exhibition is stored for a short time – no more than 4 months. With prolonged storage, the onion begins to deteriorate, its taste is lost.
You can learn about the technology of growing a giant onion Exhibition in the following video:
Subject to the recommendations described in the article for planting and further caring for Exhibition onions, each gardener will be able to achieve a good harvest of this vegetable.


