Many summer residents, in addition to the garden, give birth to various living creatures – goats, ducks, turkeys. One of the most popular types of domesticated poultry are chickens. The following describes how to equip a small chicken coop in the backyard.
Projects
There are many different projects for building a chicken coop. Only small designs will be considered here, for 5-7 chickens. Poultry houses can be both stationary and portable.
Mini chicken coops have a number of undoubted advantages:
- are small in size;
- can be mobile;
- projects with insulated walls do not require additional heating;
- the door serves to ventilate the interior space;
- inside, you only need to equip perches, 1-2 nests for layers, drinkers and several feeders.
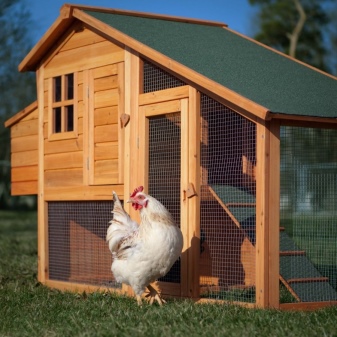
If you’re going to build a permanent chicken coop, choose a spot with medium sun exposure, protected from gusts of wind. The ideal option would be near a tall shrub, the shadow of which will protect the birdhouse from overheating, and the sparse branches of the bushes will let in diffused light. To prevent dampness, choose an elevated area for water to drain.
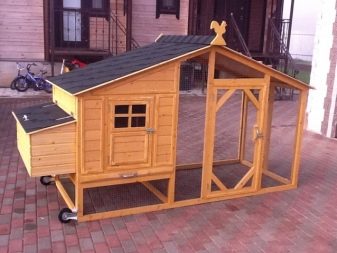
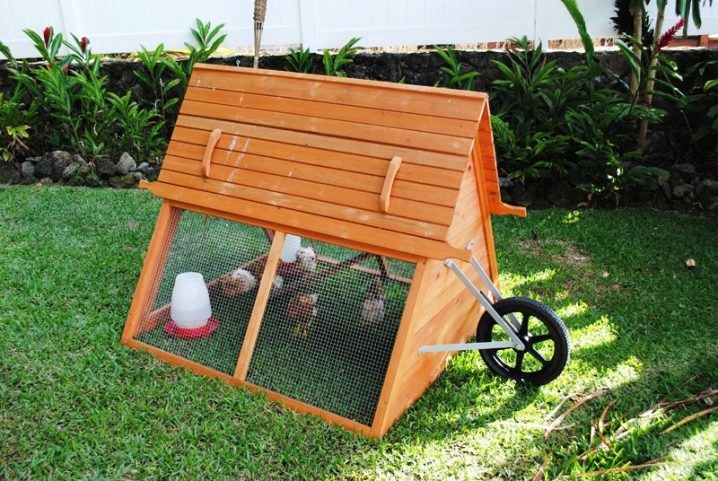
A portable chicken coop does not require such conditions. By the way, to facilitate its movement around your site, attach wheels to the bottom, and handles to the side walls.
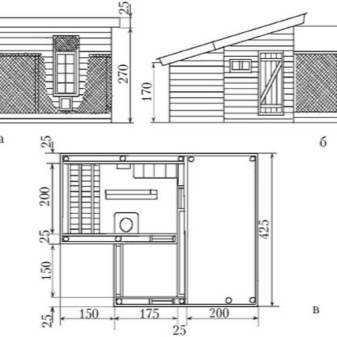
First, choose the type of your chicken coop – stationary or mobile. Then determine the dimensions of the future poultry house (note that veterinary standards determine the living area for 1 chicken at 0,33 sq. M. For 5 chickens, you will need a chicken coop with an area of u2bu1,5babout 1,5 sq. M. You can design a chicken house with a square base (1×2, 20 m), it is possible with a rectangular one (XNUMXxXNUMX m) Calculate the height based on your own height + XNUMX cm – so it will be more convenient for you to clean and disinfect the interior of the house.
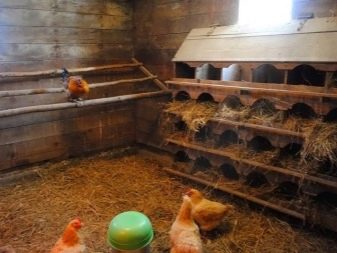
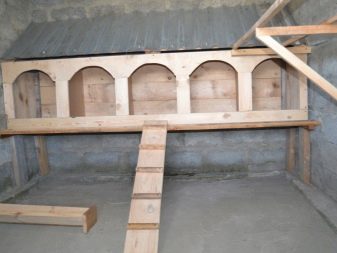
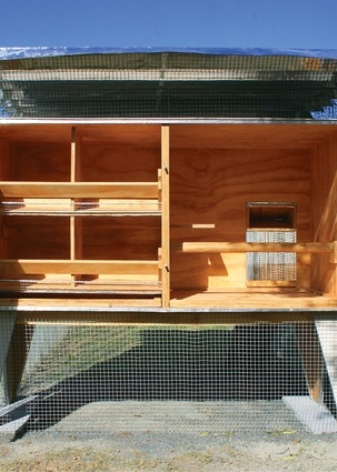
Usually a chicken coop is built in two sections – a house with nests and perches and an aviary for walking and feeding birds. The size of the nests must be at least 40×40 cm. The perches must be located at a height of no more than 1,2 m (for non-flying breeds) and equipped with a suitable ladder. Install a litter tray under the house. The size of the aviary is approximately 3-5 square meters. m, the more the better. After all, their egg production depends on how much chickens move.
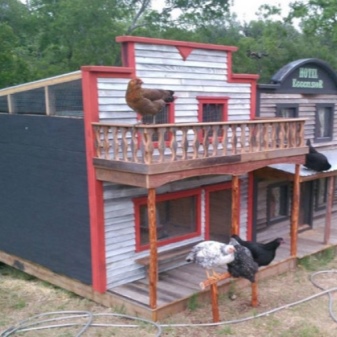
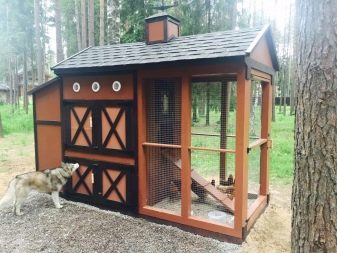
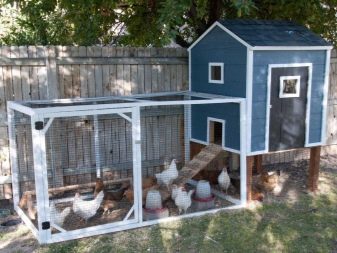
There are one- and two-story projects. Naturally, the two-story structure is more compact – the house rises above the aviary and does not take up extra space that can be used for walking birds. The shape of the enclosure depends on your imagination, some farmers make it in the form of a hut.
Materials and Tools
To build a small wooden chicken coop with your own hands, you need the following:
- for the base of the structure and perches – bars 4×4 cm of various lengths;
- sheet plywood or chipboard for nests and walls of the house;
- metal mesh for enclosure fencing;
- roofing material (slate, roofing material, etc.);
- heater;
- set of tools;
- door hinges, screws, nails, corners;
- for the window – glass or polycarbonate.
Building
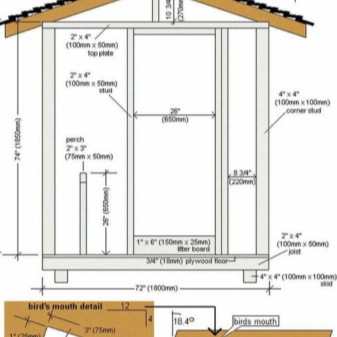
How to build a small birdhouse with your own hands? It is necessary to make a sketch of the future structure, then, based on it, a detailed drawing. Determine the size and type of building by the availability of free space in your backyard.
Building a bird house directly on the ground is not recommended. Dampness and cold will come from the ground, the chickens will be uncomfortable. Raise it on posts or build on a foundation.
Foundation
Making a foundation is only necessary for a stationary project. Choose its type depending on the time you have and your financial capabilities. The easiest way to build a columnar foundation. For it, you will need to pour concrete trenches around the perimeter of the selected area. Installation of support posts is also possible on well-compacted soil.
For a strip and solid foundation, it is required to make a formwork, and then concrete it. Both the time and the filling area increase. And this is an additional cost and wasted effort. Although, there is no doubt, a structure with a monolithic foundation is more solid than others, and it will better protect the peace of the bird from the ubiquitous rodents.
Next, the floor is laid. You can make it from boards, concrete, even clay. For a wooden chicken coop, the most acceptable option is a wooden floor. You can stretch a metal mesh with medium-sized cells as a floor (so that the chickens do not fall through, and the litter slips freely), and under it build a floor from the boards. Putting a chicken waste tray between them makes cleanup pretty easy.
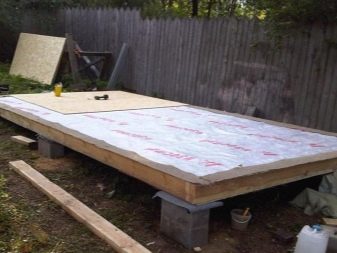
If you are building a year-round chicken coop, be sure to insulate the floor. For a columnar foundation, it is better to lay a double floor, laying insulation between the layers of boards, preferably environmentally friendly cotton wool. When using mineral wool, waterproofing material must be laid under it, as it absorbs water well and reluctantly gives it away.
If you decide to build a portable model of a mini-coop, make the floor of the aviary from a coarse mesh – it will allow the birds to peck at the grass growing on the site of the chicken coop.

Walls
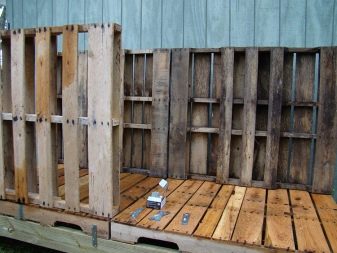
The construction of the chicken coop begins with the construction of the main frame of the building. Fasten the bars of the lower harness together so that they form a stable rectangle, you can additionally strengthen it with corners for reliability. Then they build the basis of future walls – a kind of frame, on top of which the upper trim (roof base) is installed.
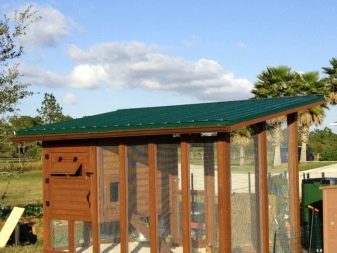
The walls can be made of plywood, chain-link mesh, or you can combine these materials. For a stationary chicken coop, at least 3 walls should protect the chickens inside from the vagaries of nature – strong winds, frosts, and the scorching sun. At the mobile summer shelter for chickens, the walls of the aviary are usually made of large mesh, and the inner house is sheathed with sheets of chipboard or plywood.
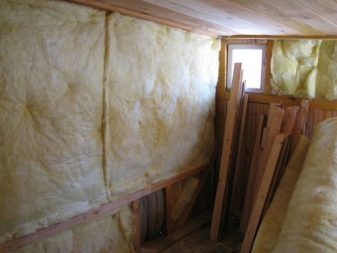
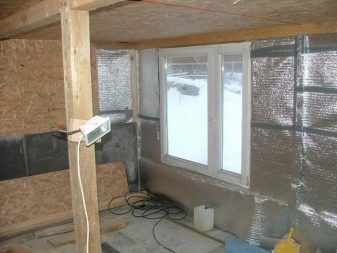
At a permanent chicken coop, do not forget to insulate the walls with foam, glass wool and other thermal insulation materials. Many summer residents do not recommend polystyrene foam because of its density and inability to pass moisture. In a house sheathed with foam, the humidity will always be high. The outer side of the walls can subsequently be treated with fungicides to protect against fungi.
The walls can also be assembled from logs or beams, especially if the residential building is also built in the form of a log house.
An example of the original design of a poultry house is a building in the form of a gazebo.
For better lighting and ventilation, make a window-window in one of the walls. The dimensions and location can be anything, but it is desirable that the window area is approximately 1/10 of the entire wall area. For a stationary house, the window frame must be at least double.
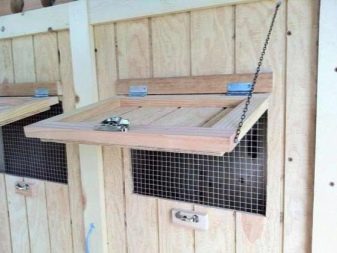
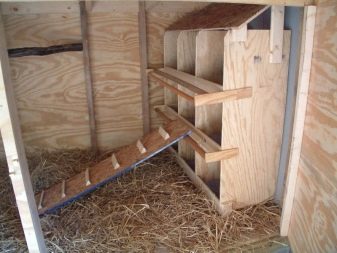
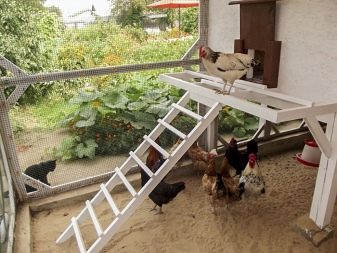
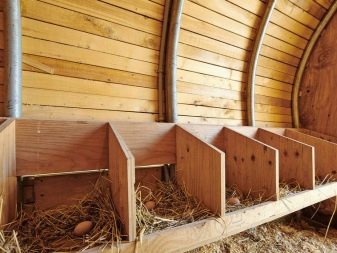
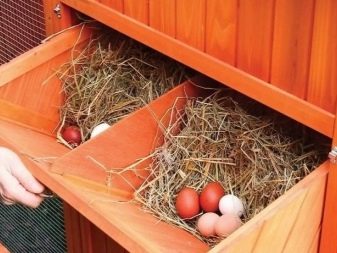
Next, an internal chicken house is set up. Its position is determined – on the ground or on the “second floor”, in the second case, a ladder is needed to facilitate the lifting of chickens into the house. Right next to the back wall of the house, 2 nests are arranged, lined with dry grass, feathers for softness. Part of the wall can be made folding to collect eggs. By the way, keep in mind that chickens have their own preferences and it often happens that they refuse to rush in prepared nests, but equip their own. In this case, you will have to somehow adapt, for example, move the nests.
The door for chickens to enter is usually mounted on the facade of the house, a little further to the perches it is advisable to make a ladder (especially if you have a breed not adapted for flight), reliable perches are attached.
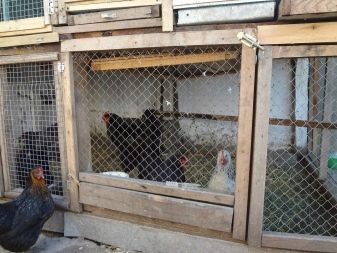
On the side, make a door for yourself – nobody canceled the cleaning! And a window for lighting and ventilation (if all walls are solid).
Roof
Now you can cover the almost finished chicken coop with a roof. To do this, support beams or a solid ceiling made of boards are attached across the upper frame. Insulation is laid on them, and on top – the roofing material. The roof is made one- or two-pitched – so that precipitation does not accumulate on the roof.
In the resulting attic, you can store compound feed (monitor the humidity – it can ban or become moldy). You can also build an additional ventilation system – run a pipe to the roof, make a plug from the outside and use it if necessary. Fill the gaps between the walls and the roof with mounting foam – to prevent drafts.
Next, we fence the aviary. To do this, we construct the frames of the side walls and stretch the mesh over them. It is possible to combine wall materials. For example, we make some walls mesh, and some solid. Also with a roof for an aviary. You can cover it completely, or you can leave mesh windows in the ceiling for better lighting and for the chickens to get their dose of ultraviolet.

Interior arrangement
The internal equipment of the chicken house has its own characteristics that need to be considered.
- Place the perches at a height of 1,1 -1,2 m, one slightly lower than the other. Their total length should be approximately 3-5 m, then 5 chickens will settle down on them with due comfort. Make the distance between the perches at least 0,35 m, and the one closest to the back wall should be at least 0,25 m away from it. Perches for chickens are usually made of rounded beams with a diameter of 5-6 cm to prevent injuries to their legs. The design of the perches must be reliable and have a good load capacity – otherwise the poles will begin to bend under the weight of the birds and may break.
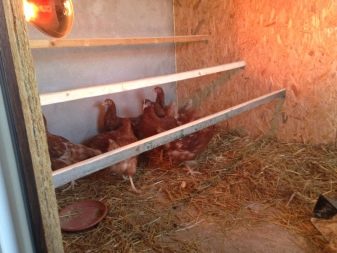

- The feeder is usually installed along the side wall of the house. The upper part of the feeder is covered by a rake – this is done so that the chickens, these slightly brainless creatures, do not scatter food with their feet.
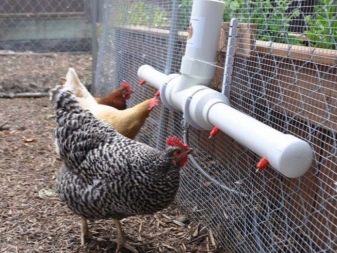
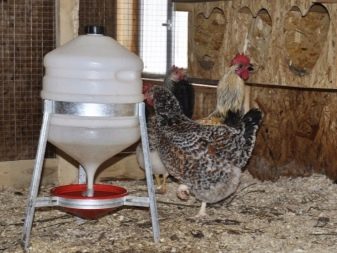
- The drinker is most often installed nipple, although a grooved version is also possible. In the aviary for walking, a feeder and a drinking bowl are also mounted. Don’t forget the sandbox for your hens. Pour a mixture of ash and sand into a wide basin; chickens love to “swim” in it. Thus, they try to protect themselves from parasitic insects – ticks, bedbugs and others. It is not recommended to put a bath with sand in the sleeping house – there is not enough space.
- To maintain ideal light conditions an electric lamp is installed in a protective case. All wires must be brought out and hidden in special boxes.
- Nests can be made in the form of boxes, built into the wall, with a removable cover for dredging eggs. The size of the nests largely depends on whether your breed is large or small. The place for laying eggs should not be cramped for birds.
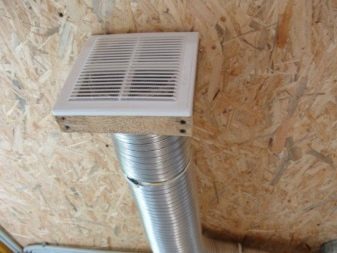
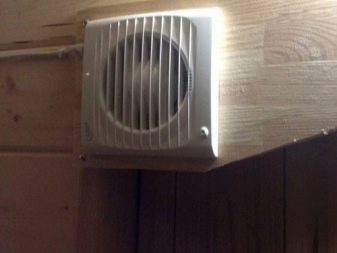
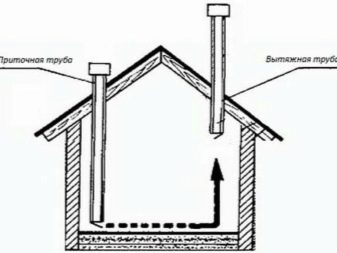
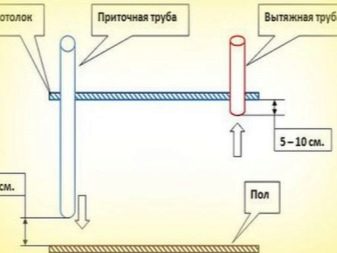
If you are building a permanent chicken coop, take care of an additional chicken house ventilation system. After all, in winter, in cold weather, ventilation through the door or window is not available. It is best to equip a supply and exhaust system in the place where the chickens sleep. To do this, 2 pipes are built into the roof, the diameter of which is 0,2 m. One will serve for the entry of clean air, the second – to remove the polluted.
To install this system, you will need to do an easy job.
- Make two holes in the roof for pipes. Place the dirty air exhaust pipe above the place where the chickens spend the night. The length of the pipe is approximately 65-70 cm, of which 0,5 m is above the roof.
- The fresh air inlet pipe is mounted away from the perch. The lower edge of the pipe is located at a level of 0,2 m from the floor. A 30-centimeter edge protrudes above the roof.
- Make visors above the upper holes of the pipes. Seal the gaps tightly with roofing material or fill with mounting foam.
- Equip pipes with shutters so that they can be covered if necessary.
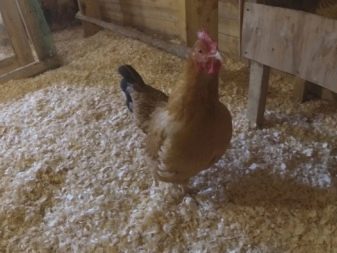
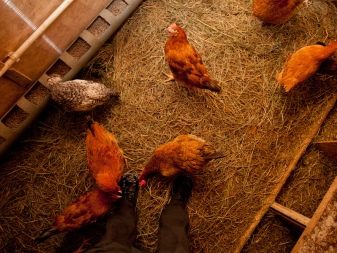
You can also cover the floor with sawdust or straw. Such bedding protects the legs of chickens from the cold, prevents bird droppings from spoiling the plank floor and stimulates the instincts of laying hens to rake hay in search of grain. The thickness of this litter is approximately 20 cm.
It is advisable to provide for the possibility of connecting additional heating in winter frosts during the construction of a stationary poultry house.
Good Examples
Here are some examples of successful and original chicken coop designs in the country.
tunnel aviary
If you love your garden, but don’t want to deprive the chickens of the opportunity to eat grass and insects, make a walk for them in the form of a mesh tunnel. It can be carried as the birds pluck the grass. Fold the mesh into an arc, at the bottom, link the edges with fishing line, synthetic fiber rope, wire. Such ligaments are also suitable for fastening together parts of the tunnel.
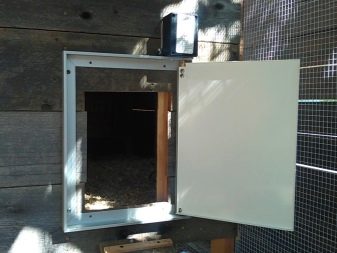
Chicken coop cabinet
Strict building, reminiscent of a chiffonier. It has one drawback – additional lighting is needed, since chickens do not see well in the twilight.
Chicken coop
The simplest design, more suitable for those who are interested in observing bird life, and not deriving practical benefits from it in the form of eggs.
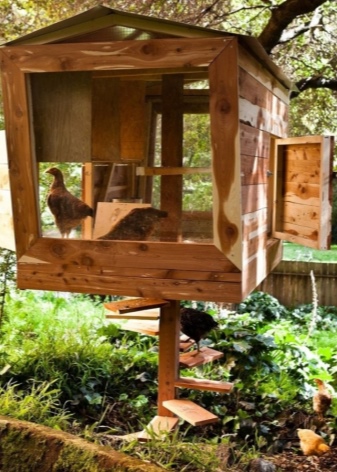
Chicken nest
The house with mesh walls is raised above the ground on one support, to which a circular ladder is attached.
If you have children, build beautiful and maximally open chicken coops – it will be interesting for children to watch how poultry behave and feed them.
Try to make the chicken house as comfortable as possible, provide high-quality food, water – and, believe me, they will thank you with fresh eggs.
A detailed story about the creation of a winter chicken coop is in the video below.


