Pumpkin crops in Russia are in high demand because they are rich in vitamins and useful trace elements. Many gardeners plant vegetables in their beds. But growing pumpkins in the open field has its own characteristics that you need to know about.
What varieties are suitable for growing pumpkins outdoors?
The following varieties are best grown outdoors:
- Muscat pumpkin. This category includes the sub-grades Vitamin, Marble, Candied, Arbat, Zhemchuzhina. The shape is round or cylindrical, the crust is soft, the color is rich orange. Butternut squash has an extended shelf life (2 years), excellent taste.
- Pumpkin culture is hard-barked. The shape is round-cylindrical, the color is orange, the taste is pleasantly sweet. A distinctive feature is a woody-hard outer shell (hard to cut).

- Large pumpkin. Among this category, it is worth growing the sub-cultivars Juno, Golosemyanka, Gribovskaya bush, Freckle, Almond, Dachnaya. Features – high yield, fruit size, softness of the coating.
In open soil, you can try to grow absolutely any variety, since the pumpkin is not whimsical and capricious. The main thing is to strictly observe agrotechnical rules.
Terms
The plant is considered to be thermophilic, but does not impose special requirements, although it loves moist soil during flowering. This is due to the fact that during this period the root system begins to develop, which needs to get stronger. If there is not enough moisture, the ovaries will fall off.
Being a “sunny” culture, pumpkin requires enough light. It does not tolerate strong winds and cold, so there should be a fence / building from the northern part of the garden.
Lighting
It is desirable to plant a crop in areas open to sunlight. This is almost the only plant that easily tolerates exposure to direct sunlight, and for 6-8 hours. Despite this, slight shading is also acceptable, so many gardeners compact crops with corn.
Temperature
Pumpkin loves heat, so +25 degrees can be considered the optimal temperature. Peculiarities:
- if the temperature drops below +8-10 degrees, the seeds do not germinate;
- at a temperature regime of + 15-20, germination occurs slowly;
- at a temperature of + 25-30 degrees, the seeds hatch in a couple of days.
Soil requirements
The soil for pumpkin crops should be saturated with humus, which will allow you to get tasty and fragrant fruits of high yield. It is desirable to drain the earth and fertilize with compost. pH acidity should be 6-6,5. The upper soil layers should not be wet, and groundwater can pass in the lower ones.
If we talk about crop rotation, then beans, cabbage (necessarily early) cabbage, onions, and garlic are considered the best predecessors. It is undesirable to plant a pumpkin after tomatoes, carrots and late cabbage varieties. Beets, greens, cucumber are considered neutral. Pumpkin can coexist with beans, radishes, beets, corn. It is forbidden to plant next to potatoes and tomatoes.
Soil preparation
Preparatory work begins in the fall, so think over a place for a pumpkin in advance. What needs to be done: free the site from weeds and crops that grew this year, and prepare organic fertilizer. To do this, mix 60 grams of superphosphate, 30 grams of potassium chloride, 10 kg of humus (14 kg of manure can be used instead). This amount should be enough for 2 square meters. m. Fertilizer is applied to the chill under plowing.
To ensure friability, coarse sand or peat can be poured along with organic matter. With very slightly acidic soil, it is advisable to add wood ash. In springtime, digging is not required, but it is necessary to remove weeds and level the topsoil with a rake.
Seedling method
In the southern regions of the country, seeds can be planted directly in open ground. But for the northern latitudes, preference is given to the seedling method of growing pumpkin plants.
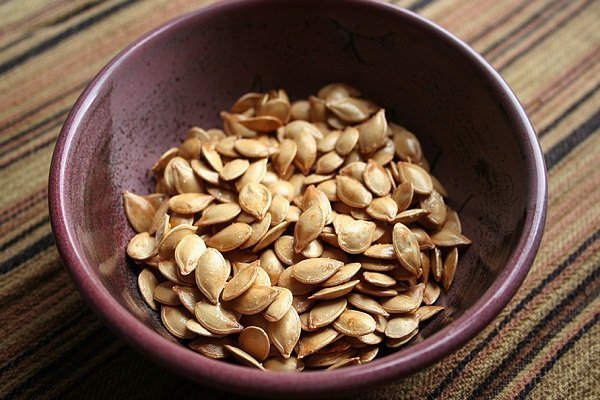
Checking and preparing seeds:
- Since pumpkin seeds are large, it is not difficult to check them. It is necessary to select complete elements for landing. If there is no time to do this manually, the seed material is soaked in water. Floated grains are considered unsuitable, as they are empty.
- For quick germination, the seeds are dipped in water at a temperature not lower than 40 degrees, not higher than 50. Keep for about 4 hours.
- After this time, the seeds are laid out on moistened gauze (can be replaced with a piece of cotton fabric).
- The elements folded into fabric are placed in a container, left for germination in the room. So that the fabric does not dry out, it is moistened 1-2 times a day with warm water (room temperature).
- After the formation of sprouts, the wrapped seeds are transferred to the refrigerator (temperature +3 degrees). Withstand from 3 to 5 days.
Landing rules and dates:
- It is recommended to plant seedlings in open ground at the age of 22 days. Therefore, depending on the climatic conditions, if the seedlings are planted in open ground, for example, on May 25, the seeds are planted on May 3, if the transplant is planned for June 6, then the seeds are planted on May 15.
- If night frosts are expected during these periods, experienced gardeners and summer residents recommend arranging local greenhouses. For this, ordinary plastic bottles are used, corresponding to the size of the seedling bush. After planting, the bush is covered with a bottle with a cut bottom, which is slightly deepened into the ground.
- Seeds are preferably planted in cups of peat. This is necessary due to the poor tolerance of transplantation measures. The minimum cup size should be 10×10 cm.
- The soil for seedlings is peat mixed with sand.
- Rules for planting hatched seeds: pour an earthen substrate into a cup so that 3 cm is left from the upper edge, pour water on top, lay the seed, add soil, moisten again.
- The first 3-4 days after planting the seeds, the air temperature should not be below 25 degrees. Further, the temperature can be reduced to +18. After a week of growth, the temperature drops by another 3 degrees. This is necessary for the further adaptation of the plant to the open air.
- In one cup, it is desirable to lay 2 seeds. When both grains germinate, one sprout is removed by pinching at the root itself.
Feeding and watering:
- The plant needs to be watered regularly – the soil should not be dry and too wet.
- From top dressing, preference is given to a solution of water and mullein in a ratio of 1:10. Fertilizer should be applied 12-14 days after laying the seed.
seedling ringing carried out 10 days after planting the seeds. During this period, the soil will shrink a little, so it is necessary to fill the pots with an additional substrate. An additional layer is created around the stem in a circle.
Landing in open ground:
- Seedlings should be transplanted after 21-22 days. By this period, three full-fledged leaves with a rich green tone should form.
- Planting is carried out in rows in which holes are made with a depth of 30-35 cm.
- The distance between the rows is 40 cm.
- After creating the holes, fertilizer from potassium sulfate and superphosphate is laid on their bottom. Additionally, soil mixed with peat and wood ash is poured. Ordinary earth is sprinkled on top, after which watering is carried out (about 2 liters of water), seedlings are planted.
- Before planting, the bottom and walls of the peat glass are slightly cut.
seedless method
The seedless method can be used mainly in the southern latitudes of the country.
Rules for planting seeds in open ground:
- Checking and preparing seeds is carried out in the same way as with the seedling method. Namely, the seeds are sorted, soaked, germinated. But you can also plant unsprouted grains.
- Sowing is carried out around May 10-20, depending on climatic conditions.
- The soil temperature should correspond to indicators from +12 degrees.
- Between rows, the distance should be one and a half to two meters, between plants – 80-100 cm. Before sowing, holes are dug and covered with fertilizers, as in the seedling method. After planting, watering is carried out.
The most common methods for growing pumpkins are:
- Classic way. The stems of the plant are located on the ground. Their direction is spontaneous, creeping.
- Tapestry method. It is used for medium-sized varieties of pumpkin crops. Throughout each row, wooden supports are installed, which are horizontally equipped with wooden planks. The wire in this case is not suitable, as it will not support the weight of the fruit. The height of the structure should reach 2 m. The distance between plants is a maximum of 40 cm. During cultivation, it is necessary to pinch and form, bind fruits and shoots to supports and trellises. Many gardeners put on a net for fruits, which is convenient to attach to the structure.
- On piles of compost. In the area allocated for planting pumpkins, compost heaps are arranged, in which small holes are made to fill the soil. Next, the seeds are sown. A prerequisite is to immediately cover with a film, which is removed after the formation of the first shoots. Advantages – there is no need for top dressing during cultivation, absolutely any variety can be sown.
- Method according to Galina Kizima. This method is unique in that pumpkins can be grown in a seedless way even in the northern regions. It is based on the digging of trenches, on the bottom of which plant remains are laid. It is they who create the temperature regime necessary for the plant. It is necessary to dig trenches in the fall (the depth corresponds to 2 bayonets of a shovel), the vegetation is laid down immediately, and at the beginning of spring it is sprinkled with soil. After germination of seedlings, a film shelter is required until the required air temperature stabilizes. Pros – no need to fertilize.
Outdoor pumpkin care
Many summer residents believe that pumpkin plants do not need special care. Therefore, the only thing that is done after disembarkation is occasionally watered. However, in order to achieve maximum yield and high quality fruits (size, aroma, taste), it is important to follow certain agrotechnical rules and pay attention to this crop.
Watering
Irrigation should be carried out on a regular basis, as the pumpkin loves moisture. Despite the fact that the root system is quite powerful and extends to the sides and depth for a considerable distance, all the same, surface roots must be watered.
In addition, the roots pump out moisture from the soil layers, which evaporates through the foliage, so there is practically no liquid left in the root system and stems.
Irrigation rules:
- Before and after the emergence of seedlings, up to the formation of a bush, it is necessary to water in small portions, but daily. The golden rule is that water volumes increase gradually.
- The greatest amount of liquid is introduced during mass flowering and fruit formation.
- The amount and frequency of water application is determined by the specific pumpkin variety.
- Do not water the plant a few days before the full ripening of the fruit.
- The temperature of the liquid should not be lower than + 19-21 degrees. Cold water is completely excluded, as the culture will die.
- After irrigation, it is desirable to carry out loosening at the very base of the main stem.
Mulching
This process is used by gardeners who do not have the opportunity to water the garden often (they rarely come to the country, there is no necessary amount of water, etc.). Mulching makes it possible to maintain the desired level of moisture in the soil for a long time.
How it is done: a special mulch is laid around the stem, thanks to which weeds do not grow additionally. The following materials are used as mulch (necessarily of natural origin, so that the soil “breathes” air):
- sawdust;
- needles from pine, spruce, fir, arborvitae and other conifers;
- peat;
- tops from other crops that are already harvested;
- weeds;
- small tree branches (mixed with grass);
- foliage.
Loosening
Since the root system is sufficiently developed, an increased amount of oxygen is needed. For this, the loosening method is used, which is done after watering or a day after irrigation. When loosening, weeds break through at the same time.
Pollination
If pumpkin plants are not pollinated, the risk of ovary rot increases. Usually insects are involved in pollination, but not everywhere there are enough of them, so artificial pollination is used. What do we have to do:
- tear off a male flower;
- pluck the petals with gentle movements (so as not to knock down the pollen);
- touch the pistils (anthers) to the female inflorescence.
The time of the procedure is before lunch. If it is not possible to carry out manual pollination using the method described above, use a simple tip: prepare honey water, spray plants (female flowers).
Shrub formation
The bush is formed without fail, as this makes it possible to get the best harvest. For this, 3 main methods are used:
- Method # 1. It is necessary to leave only the main stem, on which fruits grow in an amount of 2 to 3 pieces.
- Method № 2. Remains the main and one side stem. Quantity on each process – 2 pumpkins.
- Method # 3. There are two shoots, the main stem is one. On each of them remains mainly one fruit.
It is important to pinch the point of further growth of the stems. To do this, after the ovary of the fetus, 5 leaves must be counted. This is the point.
Additional fertilizing
Pumpkin crops require organic and mineral fertilizers, which increases yields and prevents the development of diseases. The need for top dressing is due to the fact that the plant has too large fruits, and therefore a large amount of useful nutrients is required.
Fertilization timing:
- the first time feeding is carried out after the formation of five sheets;
- the second time – during the formation of lashes;
- the third and subsequent times – every 14-15 days.
What can be fed:
- a solution of slurry and water (ratio 1:10), initial consumption for 6 plants – 10 liters of liquid, further consumption for the same number of plants – 2 buckets;
- nitrophoska (for the first time, 1 grams of the product is used for 10 plant, then another 5 grams are added to this dose);
- wood ash is required (1 glass per bush);
- mullein solution, minerals (phosphorus, potassium, etc.), industrial fertilizers of a simple, complex and mixed type.
Whip powder
If you do not carry out the powder, then the leaves, ovaries and lashes will begin to break off under the negative influence of precipitation, wind, and mechanical actions. Of particular note is another advantage of the method – when covering the lashes with soil, an additional root system develops, which draws moisture and nutrients from the soil, which contributes to plant nutrition.
How to sprinkle:
- powdering time – reaching one meter with lashes;
- unravel the elements;
- spread out on the ground in a given direction;
- sprinkle each lash with soil in 2-3 places.
How to deal with diseases and pests?
Pumpkin is not very susceptible to diseases and insect attack, however, if preventive measures are not followed, there is a risk.
Mučnistaâ rosa
This is the most common disease of pumpkins. It appears as an abundant whitish coating on the leafy part of the plant. As it progresses, it spreads to stems, lashes, fruits. As a preventive measure, excessive thickening should not be allowed, it should be watered mainly with warm water and the grass should be pulled out in a timely manner.
You can get rid of powdery mildew with the help of chemicals – Strobi, Topaz. The drug is applied no later than 20 days before harvesting, on the aerial part and soil. Be sure to remove the affected areas.
fruit rot
Pumpkin varieties are subject to different types of rot:
- White characterized by rotting of a semi-ripe and ripe fruit. Signs: a white coating is initially formed, which acquires a putrefactive structure. The pumpkin crust is affected, after which the rot spreads inward. To fight the plant is treated with a solution of copper sulfate. Be sure to remove the rotten part. To prevent the disease, it is necessary to clear the area of weeds, even those that have already been plucked (deposits).
- Root rot is localized on the root system and stem. The symptom is a brown tinge. You can cure the plant by adding to the root part of dry soil. Prevention: exclude high humidity (do not flood the plant too abundantly).
- Black characterized by the formation of gray-whitish spots, on which there is a black coating. Place of defeat – fruits, stems, leaves. Since the cause of the disease is the transmission of infection by insects, wind and tools, it is necessary to remove the affected areas of plants in a timely manner and disinfect the soil.
- Grey rot occurs against the background of a fungal infection. It appears on the ovaries as a watery-gray moldy coating. The spots are covered with conidiophores and small black sclerotia. Treatment: applying blue vitriol paste to sore spots. As a preventive measure, it is forbidden to overmoisten the soil and thicken the plants.

Mosaic
The disease refers to a viral etiology of origin, leading to serious pathological changes. Leaves, ovaries and fruits are affected.
A sign is the covering of the affected areas with a dotted pattern of a mosaic type, the color of which varies from light to dark green. The leaves undergo drying and twisting, the surface of the fruit becomes embossed.
It is forbidden to consume pumpkins affected by the mosaic virus. To prevent infection, it is necessary to get rid of weeds, remove the affected plants, and then burn them in a fire.
Other diseases
Other pests, insects and diseases:
- Bacteriosis It is manifested by the formation of brown spots on the leafy part of the plant. It spreads rapidly among crops, but rarely affects pumpkin. Treatment involves the removal of the affected elements.
- Tick of the web localized on the stems and below the leaves. You can recognize it by the presence of webs. At home, spraying with tinctures of garlic or onions is carried out.
- melon aphid sometimes affects cucurbits. The insect spreads from weeds, so they need to be pulled out in a timely manner. The seat of the aphid is the lower part of the leaves, which curl after the defeat.
- Owl caterpillars. Pests feed on stems, leaves and fruits, so the plant quickly dies. To prevent their appearance, it is necessary to dig up the garden, destroy weeds and sprinkle with whips.
- Peronosporoz – downy mildew. Signs: yellow dried spots, purple-gray plaque. Control methods: Kartocide, Kuproksat, Copper oxychloride. Prevention: disinfection of seeds and soil.
- Slug. The presence of a pest can be recognized by damage to the leaves, on which holes are formed, stripes of a silvery hue. How to get rid of: spray the plant with Creocid, set traps (watermelon peels, moistened rags, cabbage leaves).
- Anthracnose. The stem and leafy part are affected – there is a touch of a pink tint, holes, indentations. For the fight, Bordeaux mixture is used.
- Germ fly larvae. It is the larvae that destroy pumpkin sprouts and seeds. To prevent this, the seed material must be treated with Fentiuram or other insecticidal agents.
- Click beetle or wireworm. A completely harmless insect for pumpkins, but only in adulthood. The danger is represented by larvae that destroy shoots and roots. The larva is harvested by hand, the soil is treated with Bezudin.
Almost all insects can be fought with a soapy solution (1 piece of brown laundry soap per bucket of water). In many cases, Karbofos diluted with water helps (10-50 grams per 60 liters).
Harvesting
The timing of pumpkin harvest depends on climatic conditions, summer weather, variety, planting time, so there are no specific criteria. The average ripeness period is 3-3,5 months.
How to determine the ripeness of a pumpkin?
To understand exactly when you need to pick a pumpkin, you need to know the ripeness indicators:
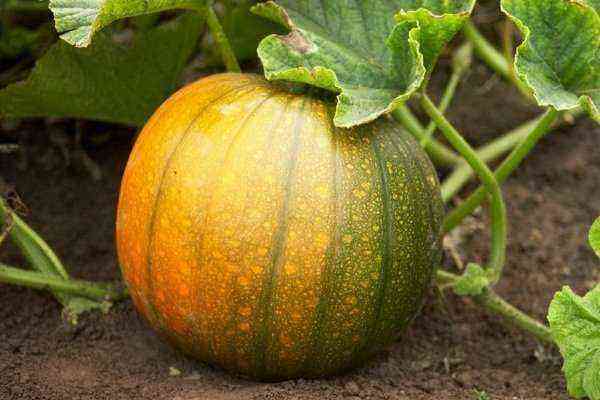
- The leaf part begins to dry out and turn pale (bright color disappears).
- The fruits are saturated with an orange color.
- The rind of the pumpkin becomes firmer.
- The stalk becomes stiff and dry.
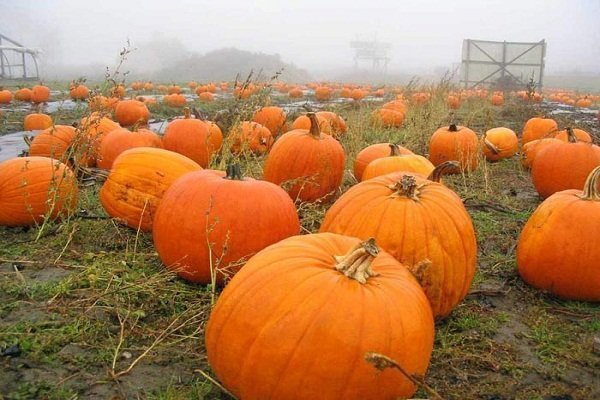
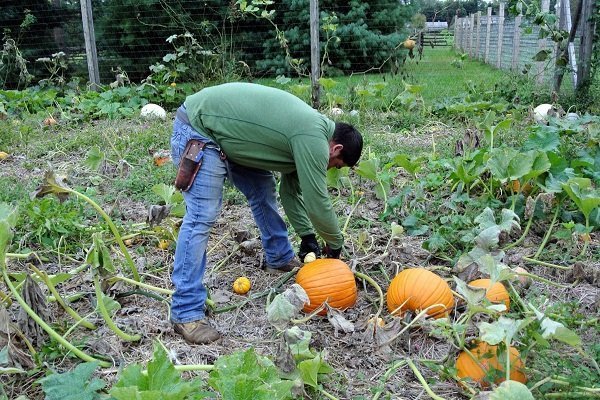
Gathering pumpkins
In order for the pumpkin to be stored for a long time, it is necessary to collect it correctly. What rules to follow:
- the weather should be sunny and dry;
- the fruit is plucked along with the stalk;
- the length of the dry stem should not be less than 4 cm;
- after collecting the pumpkins, they are placed in a room with room temperature (it is important to ensure that the room is dry);
- drying lasts 3 days, after which the fruits are transferred to a permanent storage place.
Storage Rules
The shelf life of pumpkin depends on the variety. For example, early pumpkins cannot be stored for more than a month, mid-ripening pumpkins retain their qualities for one and a half to three months, late types are stored for up to 4 months, but there are varieties that can be kept for up to 2 years.
Storage features:
- it is necessary to store pumpkin cultures for a long time in a cool, dark and dry room;
- air temperature – 2-7 degrees;
- place – cellar, basement, warehouse, storage room;
- before laying, each fruit is carefully examined for damage – holes, scratches and other crust defects should not be allowed.
About growing and pinching pumpkins, you can see in the following video:
Pumpkin is a “patient” and unpretentious plant, but without proper care it is impossible to get a decent level of yield and fruit quality. Therefore, if you decide to start growing pumpkin crops, be sure to study all the requirements and criteria. If necessary, consult with more experienced gardeners or agronomists.


