Even in a normal, moderately rainy summer, potatoes need two or three waterings. During a drought, a good harvest cannot be obtained without additional moistening of the root system. Each bush requires at least 4 liters of water when watering. Bringing such an amount of water in buckets, even if the beds occupy only 1-2 hundred square meters, is hard labor.
It is much easier to water the garden with a hose. But in this case, too much water is wasted. In addition, if the plantings are watered from above, bacteria and fungi from the leaves of infected bushes enter the soil and infect healthy plants.
The best way out of the situation was found in the countries of the Middle East, where water is literally worth its weight in gold, and farmers nevertheless manage to collect rich crops, including potatoes. In such conditions, this would be impossible without the use of a drip irrigation system for potatoes.
Features of drip irrigation of potatoes
In large agricultural holdings, drip irrigation of potatoes has been practiced for a long time. Many amateur vegetable growers have also appreciated this technology, which makes it possible to obtain consistently high yields regardless of weather conditions.
Advantages of drip irrigation:
- the water penetrates directly to the potato roots and is not wasted. If with the usual method of irrigation, water losses are up to 50%, then with drip irrigation – only 5%;
- drip irrigation can be combined with fertilizing with water-soluble mineral fertilizers (fertigation). In this case, the consumption of fertilizers is much less than with the usual method of feeding;
- you can evenly irrigate beds on slopes;
- drip irrigation is suitable for both greenhouse plants and potato beds in the open field;
- almost no water and nutrients get into the aisles, which is why weeds that do not receive moisture and nutrients grow more slowly. Therefore, you need to weed the beds less often;
- due to the uniform flow of water, the root system of plants does not experience a shock due to the fact that the excessively dry soil suddenly becomes waterlogged, and then dries up again;
- a continuous crust does not form on the surface of the bed, as with the usual method of irrigation. The soil remains loose, and the roots of the potato receive oxygen without hindrance. No need to spend extra time and effort on additional loosening of the soil after watering;
- it is allowed to treat plants with fungicides and insecticides directly before watering or right during it, since water does not get on the leaves and does not wash off the substances with which they are sprayed. Therefore, pesticides are required to be used less often;
- pathogens are not washed off the leaves, the risk of epidemics is much less;
- with drip irrigation, the soil is leached around the root system of potatoes, therefore, high yields are possible even in slightly saline areas;
- labor costs and time for watering are reduced.
When growing potatoes under drip irrigation, the yield increases by at least one and a half times.
Types of drip irrigation systems
For small private gardens and summer cottages, it makes no sense to purchase an expensive drip irrigation system that you can make yourself.
There are several options for creating such a system:
- from plastic bottles;
- from PVC pipes;
- using drip tapes.
Drip irrigation system from plastic bottles
Empty plastic bottles can be successfully used for drip irrigation of potatoes. This design is especially convenient in greenhouses and hotbeds.
You will need a small diameter tube as a dropper. A rod from a ballpoint pen or a piece (up to 10 cm long) of tubing from a used medical dropper will do. The rod must be cut and rinsed with gasoline or acetone to free it from the paste. The dropper tube is disinfected with alcohol. Then one end is welded with a lighter or simply insert a plug. At a distance of 0,5 mm from the welded place, a hole is pierced with a needle. Then they take an empty, clean plastic bottle (1,5–2 l in volume) and make a hole in it with a thick needle or awl at a height of 2–2,5 cm from the bottom.
A rod or tube is inserted into the hole of the bottle (with the welded end outward. The bottle is placed next to the plant so that the end of the tube or rod is next to the stem and the drops moisten the root, fill with water and twist.
If necessary, you can drill two holes in the bottle and use it to water two adjacent potato bushes. If the water does not drip intensively enough, the hole in the tube can be widened.
The main disadvantage of the method is that water has to be poured into the vessel through a watering can.
In the second method, the principle is the same, but a hole in the bottle is drilled 1 cm below the level of the hangers, and the bottom is cut off. Then a rod or a piece of tube is inserted into the hole, and the bottle is buried in the ground next to the potato bush to the depth of the shoulders. It is easier to pour water into the vessel than in the previous case, but the liquid evaporates quickly.
Fig. 1. Two ways of drip irrigation using plastic bottles 1 – plastic container; 2 – tube or rod; 3 – plug.
System advantages:
- simplicity;
- It is convenient to install plastic bottles in a greenhouse or a greenhouse in the country. Having calculated how long it will take to completely empty the bottle, the owner may not visit the site for several days.
Disadvantages:
- Pouring water in a container is long and troublesome. You will have to walk along the garden bed with a bucket or a hose; Therefore, the design is not suitable for large areas;
- it is dangerous to use this system on garden beds in the open field, as in a strong gust of wind, the bottle can turn over and break the potato shoots.
Installation of an irrigation system using PVC pipes
Before purchasing the necessary materials, it is recommended to draw a plan of the site with PVC drip irrigation pipes laid along it.
You need:
- a container with a volume of at least 200 liters (made of food grade plastic);
- bricks or boards in order to build a base for the container;
- male thread fitting ¾;
- tap with internal thread ¾;
- foot (detail for transition from external thread to internal thread);
- conventional mesh filter;
- PVC pipe with a diameter of ¾ and a length equal to the width of the garden;
- PVC pipe with a diameter of ½ and a length equal to the length of the beds, multiplied by the number of rows;
- threadless tees according to the number of beds;
- plugs ½ “according to the number of beds;
- one plug ¾;
- adapter for PVC pipe.
Installation algorithm:
- First, an elevation with a height of at least 1 m is built from boards or bricks, on which a container with water is to be fixed. Due to the fact that the tank will be located above the beds, pressure will build up in the system.
- A fitting is cut into a plastic container at a height of 10 cm from the bottom. This is necessary so that sand and other mechanical impurities accumulate at the bottom of the tank. Subsequently, the tank will need to be cleaned at least once a week.
- Connect the tap, filter and adapter. All connections are sealed with special tape or sanitary flax.
- A pipe with a diameter of ¾ is connected to the adapter.
- The ½ pipe is cut into pieces equal to the length of the beds.
- Holes are drilled in each piece of pipe with a diameter of ½. The holes are closed with self-tapping screws of different diameters so that the self-tapping screw of the largest diameter is next to the plug.
- A pipe with a diameter of ¾ is cut into pieces equal in length to the length of the row spacing. Each piece is connected with a tee to the adjacent piece and to a perpendicular pipe with a diameter of ½, previously laid on the bed. The connections are fixed with mastic.
- At the ends of all pipes, plugs are installed.
- If, instead of plugs, taps are installed, then the system will be conveniently flushed periodically.
Watering works without a pump, by gravity, therefore, as the distance from the main pipe, the pressure will drop and, accordingly, the water stream will turn out to be uneven. To prevent this from happening, the size of the holes is adjusted by slightly unscrewing the screws.
To save on the purchase of PVC pipes, planting potatoes under drip irrigation is carried out in double beds. The row spacing is 90–120 cm, the distance between the rows in the bed is 30–40 cm. The bushes are staggered. In this case, drip irrigation pipes are laid in the center of the double beds.
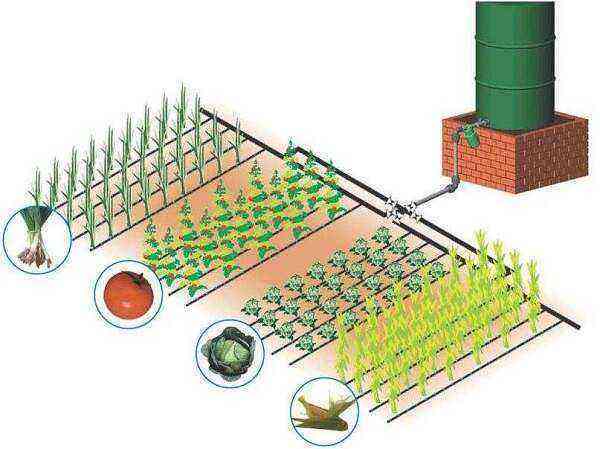 Fig. 2. Identical system for greenhouses and vegetable gardens
System advantages:
- durability;
- the possibility of uniform watering of large areas: in greenhouses or in the open field;
- ease of use.
Disadvantages:
- so that PVC pipes do not crack in winter, they need to be disassembled in autumn. It is quite difficult to assemble the system in the spring;
- it is troublesome to adjust the size of the holes so that the watering is uniform;
- high cost of PVC pipes.
Irrigation system using drip tape
There are special polyethylene drip tapes on sale, in which droppers are already mounted. The best tapes are considered to be emitter ones, since they provide uniform irrigation.
The assembly principle of such a system is similar to the installation of a structure made of PVC pipes. Only in this case, instead of PVC pipes with a diameter of ½, polyethylene tapes are installed. The assembly diagram of the structure is shown in Fig. 3.
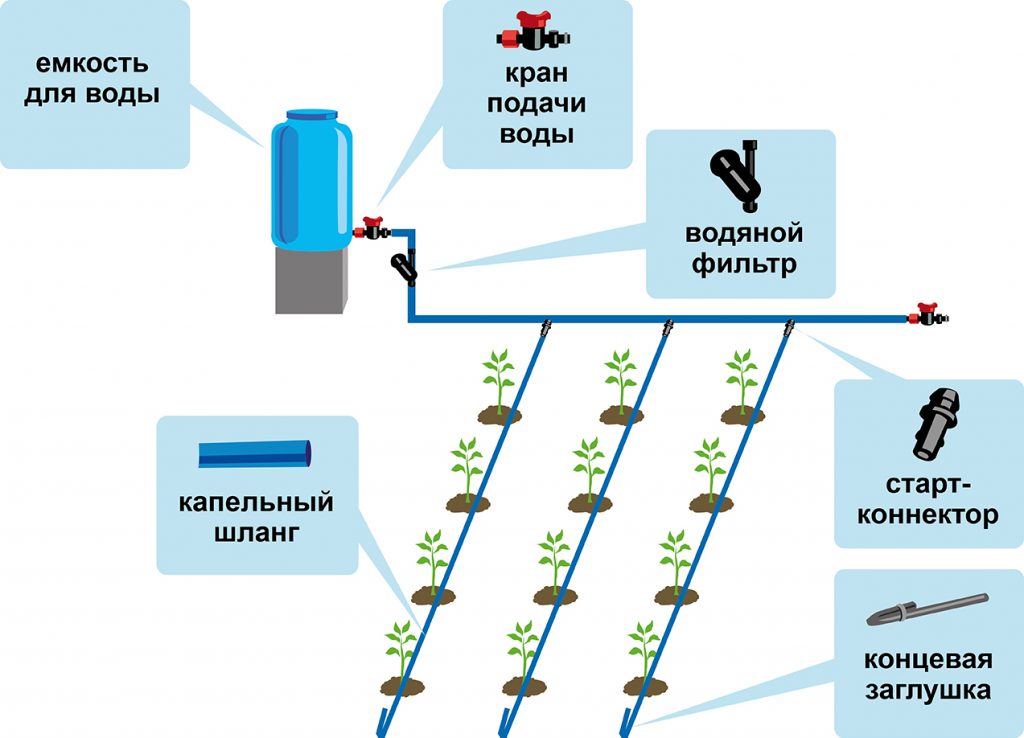 Fig. 2. Irrigation system using drip tape
System advantages:
- uniformity of watering of large areas;
- relative cheapness;
- easy storage in winter and installation in spring.
Disadvantages:
- the service life of even the highest quality drip tapes is 3-4 years;
- the tape can easily be damaged by a pet or even a bear.


