 Even a small area in a summer cottage is quite enough to make a small living gazebo from willow, linden, birch or other trees – as a rule, such a green building does not have closed walls and does not grow to the size of the main residential building. Sometimes there is enough space even in narrow sections of sectional houses.
The structure, if possible, should not be too close to buildings or in the shade of large trees. This also applies to its location close to or too close to the edge of the forest. The trees that make up our living gazebo need enough space and light for the twigs, branches and leaves to grow. If the trees are in the shade, then they are constantly drawn towards the sun, thereby forming slanting walls. It would be, perhaps, not so scary, if there was no danger that some trees will completely die due to lack of light. Therefore, when designing a gazebo, it is necessary to take this into account.
The size of the gazebo, as well as the light and soil conditions, make it possible to talk about the use of a particular type of wood. In cramped conditions, all trees with a small crown and vigorous, trunk-forming large trees are suitable, but not conifers with needles (for example, blue spruce or pine) or trees with thorns (for example, hawthorn or rose hips). The greater the growth capacity of the selected tree species, the larger the arbor can be planned.
This article tells in detail about the construction of living arbors from willows, lindens, birches and other trees at the dacha with your own hands, and also presents photos of finished structures.
Form
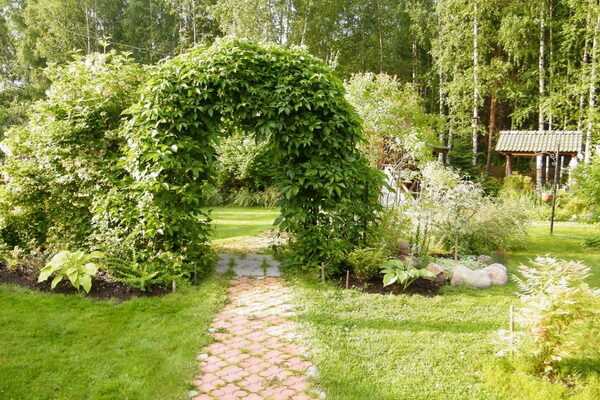
The main form, as well as the external design of the gazebo, should be carefully studied and thought out, taking into account not only your own fantasies, but also the landscape, as well as the buildings located nearby. The shape given by nature is a circle (roundness).
The cost of additional aids becomes the smallest if we try to create a room with a circular shape. For the subsequent formation from a round to a tapered roof, we need a pair of strong, long ropes. Even when we want to create large multi-section rooms from several circles, ropes alone will be enough as the simplest aids. Thanks to the tension applied only from the outside, we are able to enter the room and use it at any time without obstacles in the form of any supports, ropes or frames.
The diameter of a circular arbor, or the width of parallel walls, can be about 14 times the maximum height of the tree used. A hornbeam, for example, in our area reaches a height of 16 m.However, rooms with a diameter of more than 4 meters in a fairly short period of time can become locked (i.e., there will be no holes necessary for light to pass through) in all directions.
For large rooms, respectively, species of shrubs and trees that grow to a great height are required. For example, beech (Fagus silvatica) can be used.
Our living gazebo does not have to be overgrown from Above. The open upper circle of trees in the gazebo has a peculiar appeal. It is very simple to make a shutter at the top of the gazebo to protect it from moisture or cold – using a screen or tarp. To get a small or large hole in the upper part of the gazebo, as in the tipi of the Indians, it will be enough to bend the trunks of the young trees through the cord slightly or with effort. In this case, the trunks perform their function even when they are located exclusively vertically and after trimming they retain a certain height.
Labor costs with this simple method are much lower. Thanks to the rods or screeds, laid inside and outside, the trees will be located exclusively in one line.
In this case, lateral shoots are not shortened; on the contrary, they should grow to their maximum length. In late autumn, when they are lignified enough and become more flexible, they must be woven between tree trunks. In this case, only those lateral shoots that tend to the side from neighboring trunks are interwoven. Shoots growing directly outward protrude too far and must therefore be guided back into the main frame later on.
Rooms of a rectangular shape are also possible, but for this we need rods and frames, around which we can go around and to the corners of which we can tie trees. Without a frame, right angles with increasing height of growth of trees and shrubs will still acquire a rounded shape. However, when carrying out regular weaving work, such a skeleton often becomes an obstacle to work.
Thanks to the various options, using round or rectangular shapes, it is possible to create connected complexes of large sizes and of the most varied types.
The appearance of our gazebo can be very different. Depending on the purpose, we can produce solid, closed or open walls. At the same time, the gazebos will have light, filigree structures. Dense, closed walls are rational when we want to build a gazebo in an open, unprotected area. We should take this into account already when planting trees, during which the plants in the planting groove should be as close as possible to each other. Additionally, in the years of main growth, we will weave as many side shoots as possible into the main trellis, which is formed from the main leading shoots of the individual seedlings. If all of the above is observed, rather dense walls will appear that are resistant to wind in bad weather. Where visibility and wind conditions allow, the light and open structures of the gazebo may become more attractive. In this case, we will not need so many plants, so that even with the help of a relatively small number of trees, it will be possible to build gazebos or whole galleries with vaults and arches.
Round trees or trees in parallel rows can be joined together from above. This is how arbors or long arcades appear. Vaulted galleries, for example with closed or open sides, can also serve well as land delimiters or for connecting different parts of a garden.
As elements for these purposes, 15-20 crossed and already intertwined seedlings can serve, which could, for example, be planted in oblong containers in tree nurseries. When pre-planting plants close to each other, the closed walls of the future building are harvested in advance (perhaps soon this service will appear in landscape design firms and nurseries that grow ornamental trees and shrubs).
Even individual trees can be used to make beautiful canopies if the tree crowns are trimmed, molded, and joined in the right way.
Size
For a private land plot – with a sufficient area – a structure with a diameter of 3 m to 5 m is most suitable. The size, and to some extent also the shape of a gazebo made of living plants, in addition to the available territory, is also determined by the ability of individual tree species to form stem wood. In our latitudes, we are dealing with trees that, in a free state, can form trunks (without a tree crown) with a height of 15 m or more. If we walk through a beech forest, we will clearly feel these dimensions.
Trees with a small crown to the very base of the crown form trunks with a length of 8 to 10 m. In the narrow junction of the arbor, such dimensions are not achieved. It should also be taken into account that the trunks in the wicker connection are tilted, and for this reason they cannot reach the height that they reach in the free state.
In order to reach the opposite wall, being tilted, in a circular arrangement with a diameter of 5 m and a cone-shaped upper part with a height of about 3,5 m, trees must be able to form a trunk with a length of 7 to 8 meters. Only there, on the other side of the tree, the plant again receives more space, light and air and can now develop wider and higher towards the crown of the tree. Then, from the crown of the tree, it may be possible to form a small second level (platform).
For indoor and outdoor galleries, there is no length limitation given by the respective tree species, however there are limitations on width and height. To make it as wide as possible, you can plant several indoor living galleries next to each other. Thanks to this, the room inside is divided only by a row of columns, while, in principle, any size and any bend, turn or shape is possible.
Planting material
Which tree species is worth recommending and how big should the tree be? How many trees will it take to get a running meter of a wall?

For private garden plots, as a rule, a gazebo with a diameter of 3 to 5 m is sufficient. To create a gazebo of this size, Central European tree species are best suited. For the choice of trees, the decisive question becomes how quickly the gazebo should become suitable and what investments will be required for its construction. For one running meter of the wall, we need about 10-12 pieces of seedlings that have taken root, green cuttings and geysters.
To get a closed wall quickly, we will take the largest plants possible and plant them as densely as makes sense. Saplings ranging in size from 175 to 200 cm turned out to be ideal. They are still developing well, and with appropriate care they continuously increase in growth. Older and larger trees are not of particular interest, since planting and weaving of such plants is much more difficult, and the growth is much slower.
For standard sizes of land plots with 1-storey or 2-storey residential buildings, trees with a small crown are suitable.
In a dry place, such breeds are predominantly selected as:
- common hornbeam (Carpinus betulus, height 15-20 m);
- white or gray alder (Alnus incana, height 10-15 m);
- wild apple tree (Malus sylvestris, height 10 m);
- wild pear (Pyrus communis, height 7-10 m);
- various varieties of birch (Betula pendula, height up to 30 m, paper and other varieties, height 10–20 m, depending on the variety);
- ash-leaved, or American maple (Acer negundo, height up to 25 m) – originally from the Middle East, but feeling very well here;
- red maple (Acer rubrum, height 10-12 m).
Suitable for wet places:
- willow (Salix daphnoides, height 15 m);
- black or sticky alder (Alnus glutinosa, height up to 20 m);
- fluffy birch (Betula pubescens, height 10-15 m).
Without pruning and with optimal soil properties, these trees reach the indicated heights, however, it should be borne in mind that in the interlaced state, the height will be less.
In principle, woody cuttings, woody willow cuttings and trunk-forming varieties can also be used:
- white or silvery willow {Salix alba, height 25 m);
- brittle willow (Salix fragilis, height 25 m);
- red willow, or willow (Salix daphnoides, height 15 m);
- bluish willow (Salix eleagnos, height 15 m).
If the lignified cuttings have increased in growth, then we can plant them, leaving each of them with one main shoot, which we will soon intertwine with each other, thus forming a living arbor from them. Lignified willow cuttings grow on their own when they are already strong enough. Whole trunks, when planted at an appropriate depth and with sufficient irrigation, will strengthen and sprout. This technology is readily used to create gazebos similar to Indian tipi.
In an open area, in a large area of a garden or park, trees with a large crown can also be used:
- forest beech (Fagus silvatica, height 25-50 m);
- Norway maple (Acer platanoides, height 18-25 m);
- sycamore maple (Acerpseudoplatanus, height 20-25 m);
Various types of oak, for example:
- English oak (Quercus robur, height 20-25 m);
- American red oak (Quercus rubra, height 16–20 m);
- small-leaved or heart-leaved linden (Tilia cordata, height 16-20 m);
- sweet cherry, or bird cherry (Prunus avium, height 12-17 m);
In warmer areas, you can land:
- plane tree (Platanus x acerifolia, height 18-25 m);
- large-leaved linden (Tilia platyphyllos, height 20-25 m).
The trees with large crowns shown as examples grow well on almost all soils, only maple likes a more calcareous substrate.
On wet soil, the following are taken into account as large trees:
- swamp oak (Quercus palustris, height 20-25 m);
- willow white, or silvery (Salis alba, height 15-20 m); various types of poplar, which grow up to 20-25 m.
Large tree species can also be used in small gardens by keeping the crown small by pruning. Think of the Bonsai culture, where trees are chopped down into tiny, doll-like trees. In a free state and with good soil, uncut trees reach a height of 30 m and more. Therefore, it is possible to talk about the use of large trees on the land plot of a one-story residential building of a standard size only if their height is kept small. Do not forget about the interests of neighbors: check if the shadow falls on neighboring areas and where the foliage falls in the fall.
When choosing a certain tree species, it should be borne in mind that each tree has a special energy, an aura inherent only in this plant. Each type of tree also has its own symbolic and spiritual meaning.
Landing
You can create live gazebos in the same way as a hedge. If it is necessary to grow a gazebo on the lawn, then first, using a shovel or a hoe, we mark the lawn (preferably short-cut) along the width of the planting groove and remove a thin layer (4-5 cm deep).
We put the soil of the lawn aside – we will still need it as an edge, in which water will collect when watering already planted plants. To do this, this layer of soil is laid out with the roots upwards on both sides along the edges of the ditch. This will help, for about two weeks, to curb competition from side grasses for food and water.
Now, in accordance with the size of the root system of the planted trees, a planting groove is dug, the width of which will be from one to one and a half shovels (about 25-35 cm). The depth of the groove will be approximately equal to its width. The groove should be so wide and deep that it can accommodate the entire root. When planting trees, the ends of the root should not point upwards. However, the ditch should not be too wide – when positioning and leveling the plant in the ditch, it should be able to find support at its edges.
Only when the soil is too compacted or poor, poor soil, in order to loosen and improve it, it makes sense to dig a more spacious ditch. It is necessary to dig a hole so deep that the root collar (transition from root to trunk) does not end up too deep in the ground (the upper roots at the end should only be slightly covered with earth).
The next step is to loosen the soil of the ditch and add compost or some horn shavings. The ditch is crushed and mixed with organic mineral fertilizer (even better with rotted compost). In total, no more than 40-50 grams of fertilizer can be added per running meter of the groove. Very clayey soils can be made looser and therefore more water and air permeable by adding small amounts of sand and peat.
First, just before planting, we will bring the plants from the nursery, where they are stored in refrigerated warehouses in the shade at optimal humidity.
If young plants are brought to you earlier, then they must be wrapped and left in a calm, shady place in the garden. Wrap – This means that the roots of the trees must be covered with earth until the trees are finally planted. Then the trees, tied in bundles of 5 or 10 pieces (but better separately), are installed in a previously dug groove, covered with loose earth and watered with water. It would be very prudent if, when planting, we cut the roots and remove all lateral shoots of young plants.
When making wicker walls, it is very important that all plants grow as much as possible. To do this, it is necessary to ensure that the trunks of young trees are carefully processed before planting and directly during this work! Already when buying, it is necessary to critically consider each individual plant. Weak, retarded, diseased or damaged plants should be discarded. Also, if the mass ratio between the root and the aerial parts of the plant is not balanced, that is, the mass of the root in relation to the trunk and branches is too small, the plant is not used.
If you want all the plants to take root, you first need to place them in well-fertilized soil for one year, and just before planting, dig them out so carefully so that there is still fertile soil in the roots. This becomes important, first of all, for the hornbeam, the system of thin roots of which depends on the symbiosis of certain fungi (the so-called mycorrhiza). The plants will now be well prepared and become part of a living gazebo.
It will be useful for the growth of trees if, when planting, the plant is oriented relative to the same side of the horizon, relative to which it grew up to this point. This applies in particular to conifers – choose, for example, the direction to the north and clearly track it when you continue planting.
During planting work, especially if they are a little delayed, the roots of the plants should not be exposed to sunlight or piercing, drying winds for a long time. Old, damp linen bags or something similar will be helpful to protect the roots of planted plants.
Correct quantitative root / stem ratio:
- The root mass of this tree is not sufficient. The plant does not meet the quality for plants from professional nurseries.
- The root mass is not the same, on the one hand, it is too small and does not correspond to the quality assessment for plants from nurseries. In particular, care must be taken to ensure that individual roots are not torn up to the root collar, which often happens with automatic uprooting.
- The correct option is as follows: the root mass is sufficient and corresponds to the quality rating for plants from the nursery. The cut is marked at the bottom at the roots and at the top at the trunk.
- Geyster after pruning. The short sharp ends at the upper leading shoot cause the sap to flow along the uppermost parts of the plant. And only in the summer, when they begin to oppress the smaller neighboring plants, these ends are cut off.
The correct time to plant is early spring (March to mid-April). The best weather for landing is when it is humid outside, but not too cold, and the sky is covered with clouds. Air temperature between 9 and 12 ° C is ideal. First, we take shaded or wrapped plants and sort them by size. If this has not already been done before, then remove all lateral shoots, prune and / or cut the roots. Cutting the roots promotes the formation of adventitious roots – only with the help of these thinnest roots can the plant absorb nutrients.
To balance the different tree sizes, we plant stronger trees on the less light-spoiled north side of the planned gazebo, and weaker ones on the south side, which has an advantage in light.
When planting, it is recommended to act in such a way that first, according to size, 15-20 trees are laid out along the edge of the groove, and then these plants are quickly planted in the ground. To obtain a dense green wall, you will need 10-12 geysters, for lighter structures – 6-8 geysters per running meter of the landing ditch. We start by planting a wicker wall where the gazebo opening is provided. The first tree, which forms the end of the wall and the doorway, is placed vertically in the ditch. Since it has an advantage due to the vertical position, for this we select the weakest tree. All other trees form a diamond pattern. To do this, one tree is installed in the planting ditch with the trunk tilted to the left, and the other with the trunk tilted to the right, while during interlacing it is necessary to alternate the trunks, placing one of the trunks first under the other and then above the other trunk. Thanks to this, a beautiful, uniform weaving of tree trunks is obtained. The roots are located next to each other and intersect already at the root collar in the planting ditch. It will be very good if 1 or 2 people help you to do this work. One assistant gradually brings the plants harvested from the shady storage area, the other fixes the last trees placed in the ditch and helps with leveling until the roots of the plants are again covered with earth and fixed by lightly tamping the earth. You need to plant the plants quickly enough!
The weaving creates a self-supporting structure, similar to a hunting fence, in which additional fixation of the weaving is not required by tying it to something or securing it with a clamp.
If in the ditch we need 6, 8 or 10 trees, then we fill their roots with a small amount of loose earth on both sides, and also level the plants supported by stands at the edge of the ditch. We do the same in the future, until we find ourselves at the end of the section of the wall. Only when all the plants are set and leveled is the ditch three-quarters filled with loose soil, lightly fertilized or mixed with compost or other means to improve its condition. A large amount of water (it is best to use a hose with a sharp and rather powerful jet), penetrating deeply, captures loose soil and along with it enters the voids between the roots.
If, thanks to this work, all the roots get proper contact with the soil substrate, then on top of the roots we apply the remaining soil, once again level and orient the plants, and also compact the soil by slightly tamping it. The loose soil applied by the top layer prevents the formation of capillaries or capillary tubes and, therefore, the premature drying of the lower soil substrate in which the roots of our plants are located.
Now we put the sod removed earlier, on the contrary (that is, green down), along the edge of the ditch so that an edge is formed for collecting water. Thanks to this, water will not run off the surface of the earth, but will seep into the soil. If there is not enough turf to form a water collection edge, you can also add some loose soil.
First growing season
Spring
If we did everything right, and the weather played along with us, then after a couple of weeks, almost all the plants increase in growth. Pay attention, they are already sprouting with different strengths.
What should we do now?
First, we check to see if the individual weak trees have become too crowded. It is important, first of all, how the situation develops at the upper ends of the trees. Too narrow or cramped can be considered a situation where the stronger trees, with their foliage and newly formed side shoots, take too much light from the weaker trees. In the presence of a sufficient amount of moisture and nutrients, lateral shoots are formed in the upper part of the plant already in the first year. In large plants, we cut them off or shorten them by one or two leaves. By not hindering the growth of the side shoots of weak trees, we help them become stronger and stronger. The more leaves we leave to an individual plant, the more root mass it can build in the soil. Therefore, we only cut off the ends of the lateral shoots so that the main growth is at the upper end of the shoot.
Large-leaved trees such as the large-leaved linden or some maple species may even need to remove individual leaves. When the weaker plants are too shaded, we remove the large leaves of the strong shoot located above the top of the weaker tree.
If individual trees are disproportionately strong in growth compared to other plants, we can correct this by tying them up in the same way as other plants, that is, setting them in an inclined position. Additionally, we also remove some of the foliage at the bottom.
Summer
It goes without saying that we diligently use the water hose during long periods of drought. But we still cannot “let the plants drown”. Either our future joy or our sorrow depends on a sense of proportion.
Council. Dig up the earth with a shovel and see how saturated the earth is.
After a thunderstorm rain shower, it is sometimes necessary to additionally water the plants. Since a short, heavy thunderstorm rain often does not penetrate deeply enough into the soil, but only moistens the upper two, three or four centimeters, without reaching the roots of trees deeper.
To save water, you can make holes in the ground (near the trees) with an iron rod into which you will pour water. Thanks to this, the water goes directly to the roots of our plants, and not to grasses and weeds, the roots of which are located at a shallow depth. As long as the water collection edge is still high enough and impervious, no further action is required.
Now, while the new shoots are very fresh and rich in foliage, we leave the tree alone for the whole summer, not forgetting about timely watering. Only when young shoots become fully mature and sufficiently lignified can we begin to process them, that is, to lay them in almost any arbitrary direction and position. If the form suits us, we can already fix the shoots.
The lignification process generally ends in late autumn. Over the winter, the pulling forces of frost will make the tree even stronger and stronger.
Autumn
A rather long, fresh shoot of trees is now quietly ripening for next year. If the foliage is no longer able to form assimilates for the production of wood and root mass, then the lateral shoots of the weak tree, only slightly shortened in early summer, are now cut off to the trunk itself.
Important. Removal of side shoots and all large parts of the tree from most tree species should be done in the fall or winter. In spring, many tree species (primarily maple) are in such a strong sap flow that the cut points “bleed”, and the plant loses precious strength and important structural components! Only very few tree species can tolerate pruning in the spring. This includes, first of all, fruit trees. Beeches and hornbeams are also not particularly sensitive to spring pruning.
Ripe, lignified trunks should now be adjusted again in the lower section, and before winter, also, if possible, interlace and fix them with clamps or ties. Thanks to the supports on both sides, individual shoots become more resistant to autumn and winter storms.
The foliage interferes with normal weaving work, but it will soon fall off. The risk of breakage of shoots when weaving is low. Sometimes you can try to weave a new escape into our design. In this case, it can happen that the interwoven shoot breaks off, which, however, does not pose a problem for us, since all holes can be closed with other young shoots. We trim the split point with a sharp knife or good pruning shears. The result is the smoothest, smallest wound. In this place, next summer, several new shoots are formed, from which for further growth we will choose one strong shoot located in a favorable place. It is this escape that we will leave, and all the rest will be deleted.
Fixation aids
Immediately after planting, we do not need to tie or staple anything.
Plants still firmly support each other. Only in the following growth periods do the trees level out from a slightly inclined position to a vertical one. In this case, a little bit of assistance is needed to keep the trees in the desired wicker connection.
Ropes and ribbons
The ropes and bands for fixing should be as thick as possible, since in this case they will not easily grow into the tree and will be very easy to find if we want to untie and remove them.
However, the disadvantage of most ropes and bands is that they grow into the tree relatively quickly and prevent the sap from flowing for some time. At the same time, due to the weakened layer of bast, the tree in this place can easily break.
In addition, it is almost impossible for one person to simultaneously hold and tie trees under tension. Therefore, you will need an assistant to carry out this work.
In order to make it easier to find mating under dense foliage, it is recommended to use colorful and bright material. Severely ingrown mats are very difficult to remove. Untiing becomes nearly impossible. Only with the help of a sharp knife or scissors, with which we have to cut into the wood, it is possible to remove the rope again. Although ropes grow completely into the tree over time, they significantly weaken the interconnected parts of the trees, so it is best to remove them if possible.
Special staples
An alternative to ropes and bands, special staples, which can be obtained from a specialist store, have proven to be extremely useful. These staples were developed for floristry – thanks to these staples, it was possible to quickly connect the rods together, which formed trellises and frames for climbing plants. The staples are made of hardened steel wire and are available in two sizes.
It will take some time for someone who first handles such staples to turn and twist them until they finally figure out how to use them. But, when he nevertheless understands what’s what, they will become a great help for him. For a gazebo with a diameter of 3 to 4 meters, you will need about 100 staples.
During the height of summer, when the increase in thickness is at its maximum, these fixing devices will need to be removed where they are not required. As a rule, trees now remain in the position that they occupied up to this point. The stronger leaf axes and lateral shoots prevent them from slipping. By this time, the trees should be in their final, albeit not entirely accurate, position.
You can also remove the special staples, but the trees will be better off if we don’t. Then the staples will be completely overgrown, and after a few years they will be completely invisible.
Thin trunks are intertwined and not fixed at the tops. The upper ends of the shoots must be able to move sideways so that the maximum amount of light that can be absorbed by the plants and which is necessary for their growth is available.
Paper coated wire
The next, even cheaper option is to use already cut pieces of paper coated wire. They can easily be manually laid around the shoots, which must be fixed, and twisted at the intersection. While 800 is a pretty impressive number, these insulated wire pieces will always be useful anywhere in your home or garden. Unfortunately, the paper cover is not colored – it is made in a gray-beige tone. This slightly complicates the search for the wire, carried out in order to uncouple and remove it when it has already fulfilled its function. Conveniently, once removed, the wire can be reused.
Cable tie
Another inexpensive and practical retention aid that can also be easily installed by yourself is a plastic cable tie that electricians use to connect cable harnesses. These ties can be of different lengths, sizes and colors. Removing the fairly sturdy and rigid cable ties is not easy. The knife or scissors must be very sharp to be able to cut them, but these ties are very clearly visible.
Rubber bands
Each type of forced fixation, it does not matter, with staples, rope or tie, is bad in that this auxiliary means grows into the tree due to the rapid growth of the tree in thickness. Then the tree in this place is weakened, and each load in the form of a very strong wind or pressure during further molding and weaving can lead to a break. Since in most cases, when weaving, we do not yet need a strong connection between the trees, but only need to keep them in a certain position, a flexible, stretchable clamp will be quite sufficient. One can recommend rubber bands with loops, which are used in nurseries for quick tying and fastening. Those who have already worked with such tapes are increasingly using them as aids.
All of these restraints must, of course, be removed before they grow into the tree trunk. At the latest before each new trimming, braiding and shaping. In the fall, it is recommended to locate all braces, ties and ropes and disconnect them. While there is not much harm if such parts grow into the plant, it is still better if the trees can develop further without being squeezed by ropes and clamps.
Irrigation
Watering the trees is very important, especially in the first summer. But even during the second, third and each subsequent growing season, thorough irrigation of plants is required. Thanks to the use of a watering edge immediately upon planting, irrigation with a (not too strong) stream of water is very convenient, at least in the first year. But even without a watering edge, the plant receives enough water if we place a sprinkler or a simple lawn sprinkler in the center of the circle formed by the trees. Thus, within one or several hours, a significant amount of water required for irrigation can be supplied to the vegetation zone. The treatment area of standard lawn sprinklers is sufficient to irrigate a large area.
With this method of watering, only a small part of the water penetrates the leaves. The largest amount of water flows down from the foliage in drops and falls exactly in the place where the plant needs it most, namely in the area of the tree’s drainage. There, with the help of its thin adventive roots, the plant absorbs water and receives nutrients. The answer to the question of whether thorough irrigation is necessary at all depends on the type of tree. For example, too much water will not harm willow and alder, but beech, hornbeam and maple may have too much of this, and these trees will simply “drown”. These tree species need sufficient oxygen in the soil for their roots to function.
The mineral composition of the soil and, therefore, the soil conditions themselves play an important role in irrigation. In sandy, loose soils, water is unlikely to do much harm. But for clayey soil, excess water can lead to sad consequences, especially if this soil has previously been compacted by heavy vehicles or tractors. This problem often arises on newly built plots of land. Often, only a quick laying of the top layer is carried out, which is then leveled and sown. According to the rules, after completion of construction work, soil compaction must be eliminated by loosening with a caterpillar tractor or excavator and a deep spike (about 60-100 cm).
Geographic location also plays a role in irrigation: in lowlands, where the level of groundwater is very high, it can even overwet even sandy soil, while in sloping terrain or on tops, irrigation of clay soils is not a big problem, since excess water drains off relatively quickly.
More intensive irrigation may be required during the first growing season with prolonged drought in the middle of summer. At the same time, each tree and each irrigation will need up to 80 liters of water, that is, depending on the weather and soil conditions, up to 10 such irrigations may be required. Although with less water our plants would hardly dry out and die, but we want to reach our goal as quickly as possible – a living gazebo. We will reach this goal the faster, the better our plants are provided with water and nutrients.
In addition to a sufficient supply of water for the steady growth of plants and the continuous development of natural forces, it is also important to provide the plants with optimal nutrients. Let’s consider this topic in more detail.
Application of fertilizers
Since the plant in the early years does not yet have a widespread root system, we must supply the trees with the necessary nutrients by introducing fertilizers or compost with a high content of nutrients into the soil.
When composting with a high nutrient content, the soil is fertilized exclusively by residues in the compost and waste generated by soil bacteria, fungi, beetles and worms. Thanks to the addition of compost, the entire surrounding soil comes to life, the structure of the soil becomes loose and the so-called buffering (the ability of the soil to maintain a constant water, air and pH value) is significantly increased. This is because bacteria and mycelium form so-called soil colloids, which are highly absorbent. They attach humus to clay and sand and contribute to the formation of soil particles, which accelerate the exchange of water and oxygen. This is the best form of fertilization, and note – not only for our trees. Unfortunately, not everywhere and not always there is a sufficient amount of compost. Therefore, sometimes we have to turn to artificial fertilization.
Standard fertilizers are available commercially in various versions and mixtures. There are both fast-acting (fast-flowing) fertilizers and long-acting (slow-flowing) fertilizers in mineral or organic form. In a mineral fertilizer, readily soluble biologically active substances, for example, nitrogen, are artificially associated with high energy costs for carrying substances (minerals). These active substances are available to the plant even when they are dissolved in water. In organic fertilizers, most biologically active substances can become available to the plant only after a long decay process that occurs in the ground. But there are also combinations of both types of fertilizers. Sometimes in mixtures the mineral fertilizer acts immediately, while the proportion of organic fertilizers is absorbed gradually.
In order to exclude the possibility of unintentional excessive fertilization, it is recommended to use only combined fertilizers, or better in general, only organic fertilizers and compost. Since the plant can only absorb fertilizer in a water-soluble form, it is advisable to apply the fertilizer just before irrigation.
In the first year, we will not need fertilization yet, since when planting, we already mixed a little fertilizer with the soil, in which the plants were then planted. Only in the second year should fertilization be applied with a maximum of 20 g per tree. That is, if you take a round gazebo formed by 100 plants, you get as much as 10 kg of fertilizer. In subsequent years, you can change the amount of applied fertilizer from 50 to 100%. We distribute the mass of fertilizer over an area of about 1-1,5 m, and with the beginning of the third growing season, we will apply fertilizers around the circle of trees and inside the gazebo, which will be 3-1,5 m.
Important. The roots must learn to seek out nutrients at a great distance from the planting site. If fertilizer is applied directly to the roots, the plant becomes “lazy” and stops looking for water even in the immediate vicinity of the planting. This will lead to the fact that even with a short-term drought, the tree will be depleted and may even dry out.
However, in order to avoid the consumption of nutrients by grass and weeds, the roots of which are mainly on the surface, it is still necessary to periodically supply nutrition to the roots of our seedlings. With the help of a metal rod, you can make holes about 20-30 cm deep, in each of which a small handful of our fertilizer is poured. The roots of trees, which are deeper than the roots of grass and weeds, will find this “food” very quickly.
It is important that the fertilization holes are located where the lateral shoots of trees end under normal growth conditions: at this more distant distance, the roots will be stimulated to seek nutrients. This means that during the second and third growth periods, fertilizer holes should be made at a distance of about 1,5-2 m from the trunk. You can also add some compost to these holes to provide additional nutrients.
Another possibility of providing the trees with nutrients is the so-called deep fertilization. At the same time, with the help of a compressor, air and special fertilizer for trees are introduced into the upper soil layer under high pressure through a tube that was previously installed in the ground. This results in loosening and blowing of compacted soils, as well as long-term fertilization. Such a costly measure is usually used over large areas where it can be applied in sufficient volume. However, it can also be used on private land in cases where the soil has been compacted by tractors or other vehicles during construction.
Mulching
Chips, bark or straw mulch spread flat on the surface can improve soil fertility in the same way compost (which arises from the conversion of these materials in the soil) does.
A protective coating made from organic materials not only prevents moisture evaporation, but also activates the life of the soil. By soil life, we mean the activities of bacteria, fungi, worms, beetles and similar organisms, which decompose substances and thus make nutrients available to plants. As a result of their activity, heat is generated, which again contributes to the correct functioning of the roots. A similar effect occurs in a completely natural way when plants shed their foliage in the fall.
By spreading organic mulching materials evenly over the root area, we can compensate for the loss of nutrients. Cut grass and other composting material can also be used for this purpose.
Important. The material that begins to decompose should be loaded directly to the root collar of the tree with a layer that is not too thick (no more than 10 cm), because the temperature of the material, due to the active life of the soil during warm and humid summer months, can rise to 60 ° C or more and, therefore, damage plants whose root collar is very sensitive.
If the total area on the plot of a living gazebo is inside and outside covered with a protective layer of bark and chips, the thickness of which is from 3 to 5 cm, then grass and weeds will not be able to penetrate this layer, therefore all nutrients are provided exclusively to our trees.
To convert very woody material such as wood chips, soil life consumes more nitrogen than it emits. Then we additionally spread about 50 g of fertilizer per square meter on this area. Recommendation when buying fertilizer: the proportion of nitrogen (N = Nitrogenium) should be about 9%. If the mulching material rots after two or three years, then in this case it is necessary to lighten the soil a little. Lime (preferably dolomite lime) increases soil fertility, lowers the pH and thus prevents the spread of fungal diseases. The crustal substrate decomposes especially slowly, therefore this material is also willingly used as a top layer in the construction of paths in gardens and squares. Its surface is strong enough, clean and provides a good support for light pieces of garden furniture.
Second growing season
Spring
If the work on the weaving of trees was carried out not in late autumn and not on mild winter days, then it should be done, at the latest, this spring, even before the buds open.
If suddenly several trees that are in conjunction with each other die at the same time – that with good planting material, proper planting preparation, irrigation and fertilization, in general, should not happen – then new ones should be planted instead of them until April. If it is necessary to replace a single plant, then it is best to close the gap with a lateral shoot growing from the base, since, due to digging in the root zone, the harm caused to neighboring plants often becomes very large.
From the new shoots protruding from the base, which we usually cut off, we, if possible, leave a shoot that grows towards the green wall.
In the future, we will not be able to weave this lateral shoot in the same way as it happened earlier with freshly planted shoots. So, we leave the shoot to grow vertically, and only when it adds a little in growth, we fix it and weave it into the gap that has arisen. To do this, we can use a more winey cut of a fresh, pliable piece of wood that we previously had to cut at a different location.
Due to the subsequent increase in thickness, this adjacent young tree trunk still grows together. Only the flexible upper part of the tree can and should be drawn into the weaving. But the top of the shoot should protrude from the weave up to a sufficient distance (from 5 to 10 pairs of leaves or buds, depending on the tree species).
We interweave only if there is a noticeable increase. If there is no growth, then we only cut off the lateral shoots, and direct our attention to a healthy, strong new shoot. Irrigation is usually not required in spring.
There is also no need for fertilization, except in very depleted sandy soil. The still very grassy fighting shoots at this stage are not yet lignified, so they can be broken quickly and easily by hand. Leaves that have opened up from the bud are also removed where necessary. In this case, care must be taken not to damage the fabric under the axis of the sheet when removing the sheet. In this place, wounds easily develop, which favor the penetration of fungal spores (for example, nectria cinnabar-red (Nectria cinnabarina)).
Summer
During the summer period, it is necessary to constantly monitor whether each individual tree receives enough space and light to form its leaves and its main shoot, tending upward. In summer, as well as in spring when trees are greening, the necessary adjustments are constantly needed. From some very strong growing plants, you can take away part of the lower leaves without hesitation. This slows down their growth and gives weak trees more space and light, which allows them to thrive. Thus, we get a strong, uniform and durable structure.
It is not necessary for all trees to develop equally evenly. And it is not a problem if some of the trees immediately rush to the height. When the roof of a living gazebo is formed, the stronger trees will simply be pulled inward, so that the weaker ones get more light again and can quickly eliminate the growth retardation. All changes in the shape of the gazebo must be made guided, first of all, by a sense of proportion.
Autumn
In the fall of the second growing season, there is less work on our living weaving.
Plants, which this year, with the correct supply of nutrients and good soil conditions, have already noticeably increased in growth and formed a rather extensive root system, can now ripen and become stiff. Only after the foliage has fallen off, we remove all lateral shoots, weave the lower, strong growth and fix the weaving with staples or other fastening material.
Third growing season
Spring
Weaving work must be completed before greening. The inclination of trees to the left and to the right, that is, the diamond-shaped pattern that appears due to the interlacing of their trunks, can thus more and more go into parallels, the more we approach the provided green roof.
Removing the side shoots in the upper section becomes a little more difficult because now we need a ladder to work. We can still easily bend the shoots stretching towards the sky, and in the upper part we can take away the side shoots from them, without rushing to a dizzying height.
It is better to break off new side shoots that grow at the same time as the leaves. In order for a sufficient mass, foliage, to remain, damage to the leaves themselves must not be allowed. In the mass of foliage, the material necessary for the stability of the shoots (lignin) is formed. If the shoots become too long and not strong enough during growth, that is, not thick enough, it can happen that heavy rain can bend them down, and they can no longer straighten up. This would cause significant harm to their growth.
We leave the side shoots of weak trees practically unharmed – so that the main force of our trees is directed to the leading shoot, we bite off or cut off exclusively their outer, fresh tops.
How we will work further with the lower, already solid, zone depends on what we want to end up with: a light, light and lace structure or tightly closed green walls. The decision in favor of this or that option should be made in the spring. In the first case, we already now, as well as in the summer, will have to cut off all the shoots on the lower section of the wall so that the weaving remains visible. If we want our most dense, closed gazebo to “grow”, we only slightly shorten the side shoots and leave 10-20 cm “rods” on which leaves and other branches grow. The growing leaves and branches will soon make the green walls thick. Such a gazebo will allow visitors to retire and become invisible. They will also receive the necessary protection from solar radiation and strong winds. The advantage of this option is that in a large mass of foliage, further wood is formed for growth in the thickness of the trunk and roots lying under it.
We can get dense walls even faster if we allow lateral shoots that have a favorable composition (that is, growing to the side, in the direction of the diamond-shaped weaving) to grow further in an uncut form, and in the fall, when the shoots are more or less lignified, we weave them into ready-made diamond pattern of the main frame. A favorable composition is also formed when several lateral shoots grow from the trunks. The strongest lateral shoot in this case, as a rule, is directed away from the tree trunk and the wall of the living arbor, outward and upward, and therefore is not suitable for such a composition. Weak shoots can be easily tilted down or to the side, in the direction of weaving. If these shoots become long enough in the fall, we will try to weave them as tightly as possible, directing the shoots sideways and downward.
If we want to get the most dense, dense lattice wall in the near future, then now, in spring, we do not cut off the lower shoots in the zone of finished weaving, but leave them to grow further. Thus, we thin out trees only from the top, at their tops. Weaving of lateral shoots is carried out only in late autumn, when almost all the foliage has already fallen.
Summer
This year it is also possible and necessary to fertilize and irrigate the soil. The trees are now firmly rooted and have formed an extensive root system. Therefore, water and fertilizer should not be applied directly to the trees, but in wide strips inside and outside the tree circle.
The growth of trees in the third year should be even stronger than a year ago. The activity of the roots now extends even further in depth and breadth and supplies the plants with even more nutrients. The wicker hedge is now slowly forming a living gazebo. When we find ourselves in a circle of trees, while feeling peace and quiet, we more and more clearly understand what a wonderful job we have undertaken. Feeling the energy that emanates from the trees, we experience pleasant bliss. As we did a year ago, we make sure that the top of each individual tree receives enough space and sunshine. Except for irrigation, a little fertilization, and perhaps removing or shortening the side shoots, now we do not need to do anything but watch the plants and enjoy how our green structure develops on its own, gaining more and more strength. At this moment, we begin to realize that in each separate, still relatively thin and delicate trunk of a young plant, the power of a future tree almost 1 meter thick is born. In late June – early July, after the second growth of the so-called summer shoots, it is necessary to make some more changes. The second growth of shoots in strong trees, of course, is also more pronounced, and if we were inattentive, then weaker plants again find themselves in trouble due to a lack of light.
However, we will try to avoid this by taking away from strong plants, growing more and more, part or even all of the new, still herbaceous lateral shoots. We break off these lateral shoots or carefully cut with scissors, taking care not to damage the leaves that grow from the same place.
In weak trees, we also take away some of the lateral shoots, and we shorten the others, thanks to which the plants acquire greater strength for the formation of the shoot. Only in the lower, already quite strong, lattice weaving, in the place where we soon want to get the most dense wall, do we allow the side shoots to grow further, as already described earlier. In these places in the summer we cut off only those shoots that we do not want to weave in the fall or that cannot be weaved due to the unfavorable location.
With the summer growth of the shoots, the growth in thickness also begins again.
Where staples and ties are unnecessary, they must be removed. It is best to do this now, otherwise they may grow into the wood. Although the tree is overgrown in this place, the fixed places will still be in danger of destruction over the next one or two years.
Autumn
In the fall of the third year, just as in the previous fall, there is not much left to do. Only when the foliage has changed color and, for the most part, opal, do we remove the old ties, staples and other attachment devices that still exist, cut off the side shoots left by small plants earlier, weave and fix our wicker structure on the upper, newly grown and become strong plots. If all this is done, then you can safely wait for winter. We and our living gazebo can now calm down, retire and gain new strength – winter is ahead.
Decide how tall, wide and large your gazebo should be, analyze what tree species it is grown from. Before we start forming a green roof in the fall and spring, further growing seasons may be required with work comparable to the activities of the third year.


")

: description, photo and secrets of cultivation")


")


